The web3 space is evolving quickly, with new applications, tools, and protocols always emerging. Staking and lending assets for yield, shared social networks, and interchangeable items between totally separate games are just a few examples of the latest trends.
Innovation is constantly ongoing, and so are the tools being used to build these products. If you have ever tried to build decentralized apps (dApps) on the web, you probably have stumbled upon web3.js or ethers.js, two cornerstones of developing web3 apps in JavaScript. They both act as low-level libraries to interact with the blockchain, which means, Ethereum blockchain nodes running either locally on your computer or remotely on a server. The communication is done via the JSON-RPC protocol.
On top of those, many other libraries and frameworks arose using them as a foundation, to the point that now we have a diverse pool of tooling at our disposal, which we can use to build amazing decentralized apps and wallets.
Web3 libraries and React Native
The issue is that the majority of web3 libraries were built with their primary focus on the web, starting from the browser wallet extensions that use window.ethereum injected in the global namespace as its primary form of exposing the API.
Most tools that don't work well with React Native usually share the same reason: they rely on Node.js or browser APIs. Understandably, they might need that crypto module to perform hashing operations, or converting strings between base64 and binary with btoa and atob.
When talking about React and Ethereum, you may have heard of viem and WalletConnect. They both triumph on the web, but what about React Native? That's what we’ll be exploring in this post.
What is viem?
According to their docs:
viem is a TypeScript interface for Ethereum that provides low-level stateless primitives for interacting with Ethereum.
So viem is a newer alternative to web3.js and ethers.js. It also enables you to talk to the Ethereum RPC servers through their simplified API on top of the JSON-RPC protocol, similarly to the others, so we're able to query or modify data into the blockchain.
Viem was born to address the issues the latter two suffer from: stability, bundle size, performance and developer experience - issues already well-discussed in the community.
According to BundlePhobia, and checking the latest versions available now, viem weights 62.7kB minified + gzipped, while ethers.js weights 135.9kB and web3.js weights 152.4kB. When importing analog core features, with tree-shaking, viem can get 2 to 5 times smaller than the alternatives.
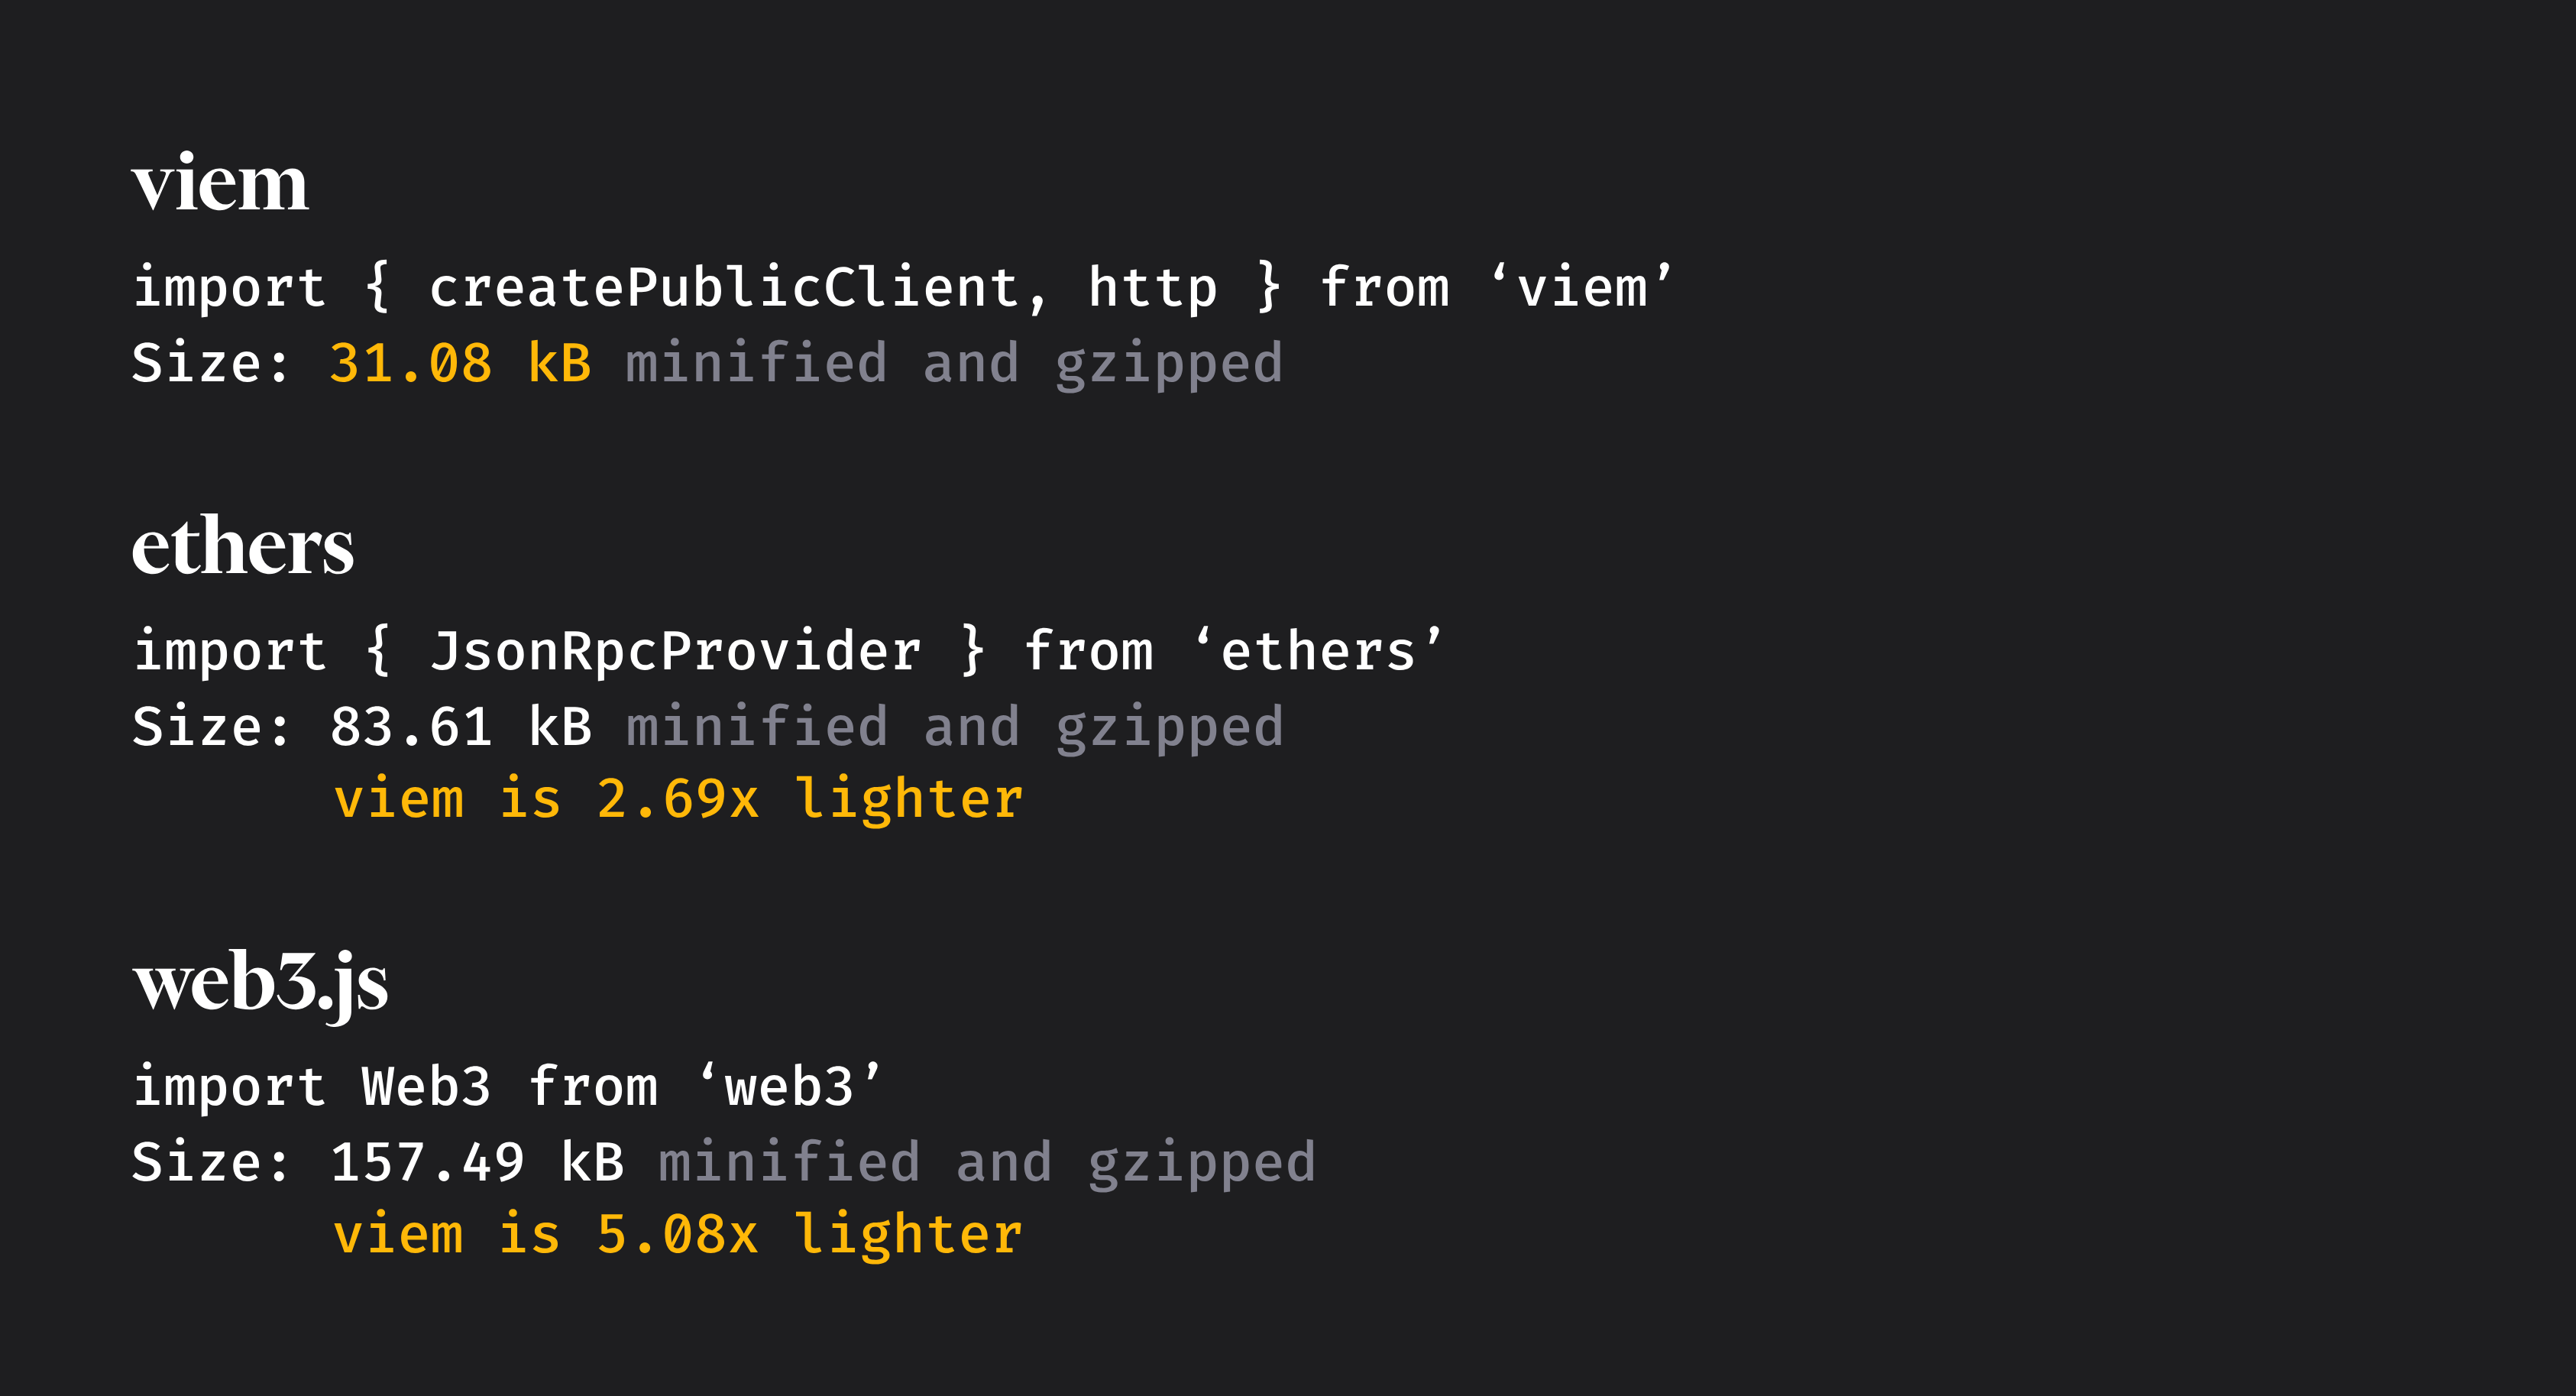
Regarding performance, viem also claims to beat the alternatives by at least 40 times in core operations like isAddress. Read more in the performance section.

And it has been quickly gaining traction as we can see in this graph from NPM Trends:

What is WalletConnect?
WalletConnect is an open protocol that allows dApps to interact securely with mobile wallets. It enables users to connect their wallets to dApps by scanning a QR code or clicking on a deep link. Once connected, dApps can send transaction requests to the wallet, and the wallet prompts the user for approval before signing and broadcasting the transactions.
WalletConnect is the actual standard for connecting wallets in Ethereum apps, and with v2 it is expanding to become chain-agnostic. One of its biggest advantages is being supported by dozens (hundreds?) of wallets, hence it is more attractive than integrating several wallet SDKs separately.
Also, the WalletConnect SDKs provide easy-to-use APIs and a plug-and-play UI to choose the wallet that best suits you. It is supported by MetaMask, Rainbow Wallet, Trust Wallet, Coinbase Wallet, Safe Wallet, and many others. The probability that the wallet you're using is supported by them is very high.

In WalletConnect v2.0, a chain-agnostic interface was implemented, and now WalletConnect can support multiple chains besides Ethereum. To understand more about the differences in v2.0, check Pedro Gomes's post on the topic.
Building a dApp in React Native
If you want to check the final code by yourself, here's the repository.
Requirements
- Expo environment setup (Node.js, Git, Watchman)
- A Wallet Connect Cloud project ID
- Expo Go app installed in your smartphone
- One or more web3 wallets installed in your smartphone (e.g. MetaMask, Rainbow Wallet, Trust Wallet, etc.)
Creating a new Expo app
Start by creating a new Expo app:
Then immediately rename the App.js file to App.tsx. Expo will know we're trying to use TypeScript and will ask to install the dependencies when you try to run the app.
Run the development server, and if everything is working correctly you should have a blank app:

Querying data from the blockchain
Now, install viem:
viem needs a simple polyfill for the EcmaScript TextEncoder API, which you can easily install by running the command below. For more information, see Platform Compatibility.
We need to apply the polyfill as the first thing when running our app. So, to keep things organized, let's create a new polyfills.ts file that will hold all our polyfills, in case more are needed later:
And on App.tsx, import the polyfills in the first line:
With viem and the polyfills installed, we're now able to interact with the blockchain data. On App.tsx, create a public client above the App component:
We’ll use the public client to send requests to the RPC server running an Ethereum node. Here we have configured it saying that we're targeting Ethereum mainnet, and will do it through http, but if needed, you could choose to use polygon (or any other chain), as well as communicating through WebSockets or a custom EIP-1193 compatible provider (we’ll see more about this later).
With the public client set up, it's just a matter of calling the right methods and putting in the state so we can visualize.
Create the state variables that are gonna hold our values. viem will return the values as BigInt, so we initialise them with 0n:
In an useEffect, fetch the network data on mount:
Then, show them on the screen:
viem responses will always return in wei, which is the smallest unit in Ethereum, and equivalent to 10^-18 ETH. To transform to ETH, we use the formatEther utility.
And ta-da! You should now have your app looking somewhat like this, with real data coming directly from the blockchain.

Interacting with your wallet
Now, you probably want to connect your wallet, to be able to display your address, sign messages, send transactions and other actions that require wallet permissions.
To support as many wallets as possible (and consequently as many users as possible), we'll use WalletConnect's WalletConnectModal. This is an advanced SDK from WalletConnect for more granular control. At the time of writing, it is currently their only production-ready React Native-compatible SDK, since they just announced the alpha version of Web3Modal SDK for React Native. We’ll cover this one in a future blog post.
WalletConnectModal, as the name says, will open a nice-looking modal UI for the users to select their preferred wallet among several options. Upon selecting, the user should be deep-linked to the wallet app, asking for permission to connect.
Installing WalletConnectModal
Run this to install the WalletConnectModal SDK:
Then, install the other dependencies and polyfills:
Optionally, for iOS, you may want to specify wallets to detect automatically in case the user already has them installed, to show them first. You can do it by adding the wallet schemes under the iOS configuration in app.json:
For more info, or if you're using a different version of Expo, please refer to the WalletConnectModal docs.
Using WalletConnectModal
The setup is done, now let's move to the actual use.
At the top of App.tsx, add your projectId and providerMetadata:
If you don't have a projectId yet, you’ll need to go to WalletConnect Cloud and create an account and project. The project ID will be in the project's settings page.
For providerMetadata, use whatever values best describe your project. The values at the redirect field should represent your app's scheme, for Deep Links, and link, for Universal Links.
To be able to interact with the modal, we’ll call the useWalletConnectModal() hook, at the beginning of the App component:
This provides us with a lot of useful information:
- open: method to programmatically open the modal
- isConnected: straightforward, boolean
- provider: an EIP-1193 compliant provider, a standard for consistency between Ethereum wallets and applications
- address: the connected wallet's address
The provider is the instance that actually sends requests to the RPC server and listens for events. We won't be using it directly though, we’ll pass it to viem so we can leverage viem's higher-level abstractions.
Now render the modal component, and a Button to open it:
At this point, you should have something like this:

Connecting and disconnecting
To connect, it's just a matter of opening modal and choosing the desired wallet, and the connected address will be available through the useWalletConnectModal() hook. To please TypeScript, we’ll re-declare the address variable, since the address returned from the hook is a string, and viem will always consume a more sophisticated 0x${string}.
We can update our UI to show the address when isConnected is true, and also add a button to disconnect:
Notice how we can disconnect just by calling provider?.disconnect().
Now, your app should be working similarly to this:

Setting up listeners
We want to know when the app has connected connect event) so we can show the address, balance, and chain. We also want to know if the user manually changed chains directly via their wallet (chainChanged event), to show and hide elements, or block and unblock features.
Start by adding a CHAINS constant outside the component, the list of chains that are going to be supported by our dApp. This will allow us to find the chain object easily when switching chains.
Then, we’ll need a second useEffect to register listeners:
- When the chain changes, we get a chainId. We search for the chain with this id in the CHAINS constant, and set it in the state
- When the app connects, we extract the chainId from the event, and reuse the same method from when the chain changes, to keep the chain updated. Then, we also get the wallet balance with the getBalance function, and set it in the state
Now, add 2 new state variables to keep track of the current chain and balance :
And update the UI again to show these values:
With the above setup, we already have our UI updated when connecting a wallet or switching chains, nice!
You can test that by manually switching chains in your wallet, and seeing it reflect in the dApp UI:
.gif)
Signing a message
Wrapping everything up, let's use our wallet to sign a message, and prove that we're its actual owners.
We’ll create the wallet client and a signature state. The former is similar to the public client we created before, but it has access to the provider and is able to request permissions to the wallet. The latter will hold the signature hash proof.
It's important to memoize the wallet client, since it depends on the provider that comes from the WalletConnect modal hook, and we don't want it being recreated (and messing with our session), when the component re-renders.
Now, let's add a handler that will request the wallet to sign a message when called:
We call viem's walletClient.signMessage(), passing our address and the message we want to sign. This message will be displayed in the wallet's UI, and wait for the user to confirm. If confirmed, we’ll have a cryptographic signature, which we'll display in the UI just for presentation purposes.
Finally, let's update our UI with a Button to call the onSignMessage handler, and a Text to show the signature proof.
You should end with something that looks like this:
…and works like this:
.gif)
Summary
To sum things up, the classic libraries are still there and are still going to work. If you're constrained to it, better enjoy it, knowing that you can still build great applications.
But for the modern JavaScript way, there is viem, the cool new kid in town that brings enhanced performance, a smaller footprint, and better DX. Pair it with the WalletConnect solutions and you have a great stack to build any front-end to your smart contracts.
The web3 space is still too young, especially when it comes to React Native.
All the code shown in this guide is available publicly on GitHub.


Learn more about Web3
Here's everything we published recently on this topic.