Wagmi “[…] is a collection of React Hooks containing everything you need to start working with Ethereum”. Basically, it provides the developer with exceptional DX to work with Ethereum through easy-to-use hooks like like useAccount(), useBalance(), useSendTransaction(), and many others.
Wagmi previously used ethers.js underneath, but now uses Viem, a modern low-level library to interact with Ethereum built by the Wagmi team themselves.
Maybe you read my previous article “Build modern web3 dApps on Ethereum with React Native and Viem”, and thought to yourself: “wait, if we're already using Viem, and Wagmi is built on top of it, why not go for Wagmi at once?”.
It's a good question that we will be exploring next.
The difficulties with React Native and Wagmi
At the time of writing, the Wagmi team just announced Wagmi v2 alpha! At this stage breaking changes are possible as the Wagmi team works on polishing user-facing APIs. Keep in mind, in this article we're still using and talking about Wagmi v1.
While Wagmi itself does not depend on any browser APIs, the wallet SDKs it interacts with heavily do. That's because the first generation of dApps and wallets were made primarily for the web, and we're only trying to catch up now.
Wagmi has the concept of “Connectors”, the interfaces we use to connect with wallets. If you look at the Connectors page, you’ll find a few built-in, ready to import and use. They are amazing and super useful, but only targeted for the web.
For example, there's a MetaMask Connector, but it relies on the Injected browser wallet (window.ethereum). Also, there's the WalletConnect Connector, but it also relies on WalletConnect browser SDKs.
So, what are the options?
I created a few discussions in the Wagmi and WalletConnect repositories to try to understand it. If you want to know more, give them a read:
Option 1: create your own custom Connector (the hard way)
There are pretty good instructions in the Examples page, and it is not as difficult as it seems. I was even able to create a custom “MetaMask Mobile Connector”, that wraps the MetaMask SDK, works well, and deep-links to the MetaMask mobile app. But if I want to support multiple wallets in my dApp, I would have to do this for every wallet SDK — if it even exists.
Option 2: use WalletConnect Web3Modal for React Native
That's the easier and better option, whereby you use WalletConnect’s recently-released Web3Modal for React Native. Web3Modal is an all-in-one SDK for connecting apps to wallets. It already triumphs on the web, and we're happy to see it coming to React Native too. Better yet, with easy Wagmi integration.
Guess what? Below their nice wrappers and API, there is also a custom Connector in there.
Building a dApp with Web3Modal React Native + Wagmi
If you want to check the final code by yourself, here's the repository.
Requirements
- Expo environment setup (Node.js, Git, Watchman)
- A Wallet Connect Cloud project ID
- Expo Go app installed in your smartphone
- One or more web3 wallets installed in your smartphone (e.g., MetaMask, Rainbow Wallet, Trust Wallet, etc.)
Creating a new Expo app
Start by creating a new Expo app:
Then immediately rename the App.js file to App.tsx. Expo will know we're trying to use TypeScript and will ask to install the dependencies when you try to run the app.
Run the development server, and if everything is working correctly, you should have a blank app:

Installing Web3Modal
Start by installing the Web3Modal and dependencies:
Notice that we're installing wagmi and viem too. Web3Modal will already set them up for us!
Then, install these extra packages to help with async storage, polyfills and SVG’s:
If you're on Expo 48, please also follow these instructions. If you have any issues, please check the Web3Modal for React Native docs.
Enabling Wallet Detection
Optionally, for iOS, you may want to specify wallets to detect automatically in case the user already has them installed, to show them first. You can do it by adding the wallet schemes under the iOS configuration in app.json
Make sure your have installed @walletconnect/react-native-compat@2.10.5 or higher.
When running in development via the Expo Go application, you might see the wallet detection is not working. This happens because the detection is done via the scheme names present in the app’s Info.plist file, and the Expo Go app downloaded from the App Store was compiled without it. But don't worry, when you run a production build or generate a standalone iOS project with npx expo prebuild, the above configuration will be persisted in Info.plist, and therefore be able to detect the installed wallets.
Using Web3Modal
At the top of App.tsx, outside the App component, add the Web3Modal configuration. Add your WalletConnect Cloud project ID, metadata for your dApp (will be shown in the wallets when sending requests) and the list of chains that are going to be supported.
For this example, it's important to keep polygonMumbai in the chains list, as it's going to be the test network we’ll use to send transactions.
Make sure to import @walletconnect/react-native-compat before wagmi, as it will apply necessary polyfills. Usually, we can keep it in the very first line.
Then, to have everything set-up, we need to add three more things:
- WagmiConfig: the provider that is going to share the Wagmi context with our application
- Web3Modal: the actual modal component
- W3mButton: the button to open the modal
To keep things organized, we’ll create a new page under src/pages/HomePage.tsx to place the button.
In App.tsx, add the WagmiConfig and Web3Modal:
And in HomePage.tsx add the W3mButton.
Alright, Web3Modal setup is done! 🎉
At this point, our dApp should be looking like this:

Using Wagmi
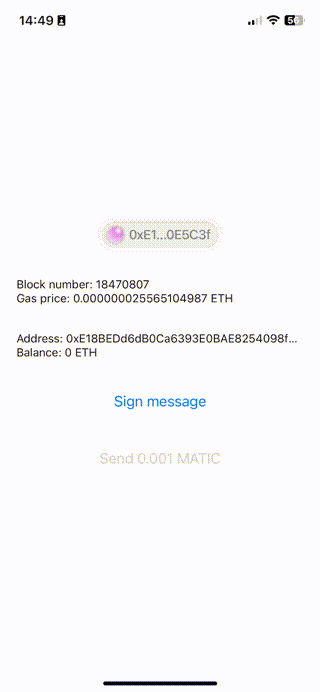
Now that we have our wallet connection working, let's proceed to querying public data from the blockchain. Wagmi makes this super easy with their collection of React hooks.
- Get the current block number with useBlockNumber()
- Get the current gas price with useFeeData()
- Get the connected wallet address with useAccount()
- Get the connected wallet balance with useBalance()
It couldn't be more straightforward.
If the returned values look like the result of network calls, it's because Wagmi is built on top of Tanstack Query. If you're familiar with it, you can expect the same nice API, caching and re-fetching utilities, extract flags like isLoading, isSuccess, isError, or even the refetch operation. Since at the start we created our Wagmi config as a chain-aware function, every time we change chains, those calls are going to be refetched to match the current chain values. Also, see that from useAccount() we know whether our wallet is connected, and we use the address as a parameter to the useBalance() call. We also pass formatUnits to format the fee data and balance to the main price unit (ETH in Ethereum, MATIC in Polygon, etc.) instead of wei, the smallest denomination of ether.
Now, show everything we have in the UI:
Notice how for both feeData and balance, we access the .formatted field inside the result. One of the benefits of Wagmi is formatting those values according to the formatUnits option and returning them as a String, for ease of use.
- The result of blockNumber is of type BigInt. Because of that, we cast using String when displaying it in the UI.
- To access the gas price inside the feeData result, use feeData?.formatted.gasPrice
- Since the address and balance are only known after connecting the wallet, conditionally render them based on isConnected If not connected, both will be undefined.
- To show the balance, use balance?.formatted. To show the actual symbol (ETH, MATIC, etc.), use balance?.symbol
After all these changes, this should be the result:

Wallet actions
We're going to be building two wallet actions:
- signing a message, often used for authentication, to prove that we're the actual owners of the connected wallet,
- sending a transaction: transferring tokens (test tokens in a test network) to another address.
But first, create a new component under src/components/WalletActions.tsx so our HomePage doesn't get too messy. Render it right below where we're displaying the balance:
Signing a message
In WalletActions.tsx, to sign a message, as you may already guess at this point, we’ll use useSignMessage:
Add a button to execute the signMessage handler. And for presentation purposes, to check that the signing was successful, display the signedHash in the screen.
It is as easy as it looks. This is the flow in action:

Sending a transaction
Now, sending a transaction requires using 2 hooks: usePrepareSendTransaction and useSendTransaction. Why usePrepareSendTransaction? It's called a “Prepare Hook,” a solution that the Wagmi team found to prevent UX pitfalls due to long-running async tasks when performing transactional operations, such as sending a transaction or calling a write function in a contract.
In short, when sending a transaction, we first need to estimate the gas price for the operation. This is done via a call to the RPC server, which is asynchronous and long-running. The prepare hook does that in advance, before we actually press the “Send” button (which is going to call useSendTransaction). This allows the dApp to move faster and deep-link to the wallet instantly, providing better UX than having to wait when pressing the button, which would give the impression of an unresponsive application.
Above was described the Slow TTOW (Time To Open Wallet). To read more about this and other UX pitfalls prevented by Prepare Hooks, read the Wagmi docs.
Back to the code, add the two hook usages:
Here, notice a few things:
- For this example, we're setting chainId to be polygonMumbai. Mumbai is a test network for the Polygon network. Test networks are meant to be a safe and riskless environment to develop our dApps and smart contracts, without costing real money to interact with the blockchain.
- In the to field, you should input an address that is going to receive the tokens we're sending from the first address.
- In the value field, we're saying that we’ll be sending 0.001 test MATIC, the token from the Polygon Mumbai network.
- The result config from the prepare hook is passed as parameter to the actual useSendTransaction() hook.
Optionally, to provide better feedback to the user, add the useWaitForTransaction() hook. You pass a transaction hash and the hook will watch for the transaction completion. Then, on success or failure, the dApp can display a pretty message or toast about the transaction status.
For the sake of simplicity, let's use it together with the built-in React Native API Alert.alert() :
And finally, render a new button so we can actually send our transaction:
Congrats 🚀 Everything is ready at this point, and we just need to test the whole flow.
Claiming test tokens
To claim test tokens, and be able to test sending transactions, use the Mumbai Faucet.
Faucets are simple applications where the user inputs their address and receive a few test tokens to be able to pay for gas or test transactions while developing a dApp or smart contract. At the origin of a new test network, a huge amount of test tokens are distributed to known players building on the network. A few of them also decide to create a faucet and distribute a limited amount per day to help popularise the brand while helping other fellow developers.
The Mumbai Faucet distributes 1 MATIC per day, so use sparingly. That's why in this example we're testing with only a fraction of that - 0.001 MATIC - to have enough tokens to test several times.

Adding the test network to the wallet
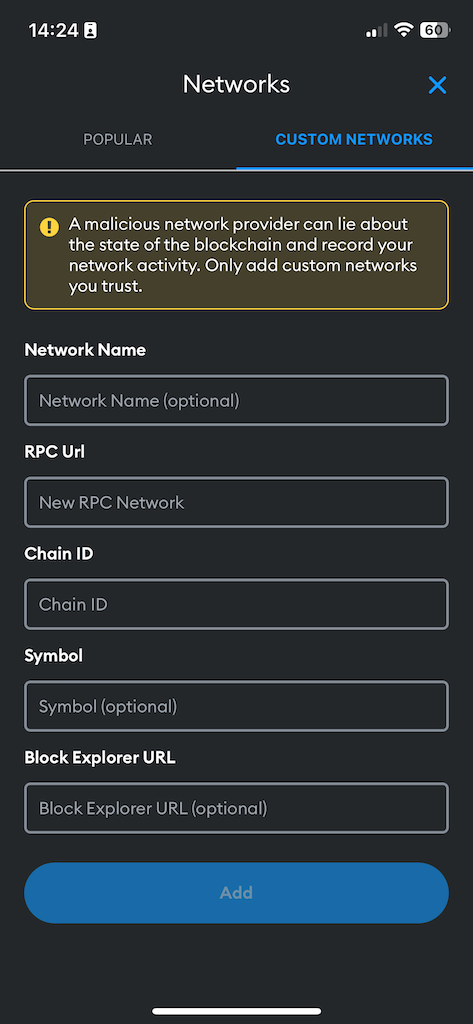
If your wallet doesn't show the Polygon Mumbai network pre-added, you're going to have to add it manually. For MetaMask, follow the process below. Other wallets might have different ways of doing it, but in the end you will always have to input the network information somewhere.
MetaMask: Network selector (top of the screen) → Add Network → Custom Networks
And input the following information:
- Network name: Polygon Mumbai
- RPC Url: https://rpc.ankr.com/polygon_mumbai
- Chain ID: 80001
- Symbol: MATIC
- Block Explorer URL: https://mumbai.polygonscan.com
Be careful: never add networks you don't trust. A malicious network provider can lie about the state of the blockchain and record your network activity.
Testing the transaction
This is how the transaction flow looks like:
- Press the send button. The button is disabled if the active network is not Polygon Mumbai.
- Review and approve the transaction in the wallet.
- Wait for transaction confirmation.
- After confirmation, go back to the dApp. An alert will pop up notifying the user about the success of the transaction.
Summary
The web ecosystem is more mature than React Native when it comes to web3 libraries. While there are challenges in integrating React Native with Wagmi or existing web-centric wallet SDKs, it's slowly becoming easier.
The biggest leap forward in this regard is WalletConnect’s newly-released Web3Modal for React Native, which facilitates Wagmi integration, and shows promising features and easy integration.
In this article, we've covered how to build from the ground up a new React Native decentralized app, demonstrating most basic functionalities and using notorious libraries like Wagmi and WalletConnect Web3Modal to provide us with excellent developer experience.
All the code shown in this guide is available publicly on GitHub.


Learn more about Web3
Here's everything we published recently on this topic.