.webp)

Introduction
At Callstack, we believe in learning by doing. We see that AI is making waves in the current technical landscape, and its possibilities are very exciting. So we headed out for a journey to learn the ins and outs of this technology. As R&D department we decided to make a transcription app our first goal.
The idea behind the app is simple: making quick and efficient transcriptions from recordings of internal meetings. Setting that goal opens up the following opportunities:
- Understanding how to make inference with AI models
- Possibility of running models locally in order to keep data private
- A great starting point for future research
- Improved fluency in Python and its libraries
Important notes: We're aware of existing transcription products and live transcription options. Our approach is more about understanding the engineering behind it. This isn't a step-by-step guide but a high-level overview, with resources and our open source repository for inspiration.
Use cases
For the user, the use cases should be as follows:
- upload a recording
- receive a transcript of recording, including speakers turns and timestamps
- app should run on local machine to have a secure solution
Lesson One: It’s super-simple if you don’t trip up
When starting a project it’s important to keep in mind the priorities. Our priority is the AI part of application. We could easily get stuck at trying to get correct tokens, and API calls to fetch the recordings from the cloud, and “simplify” it for the user. But as a first step we didn’t want to end up with “video downloader” but with “video transcriptor”.
At the start we knew that we will be using OpenAI’s Whisper to perform automatic speech recognition. If you are not familiar with that name, that’s a speech recognition model released under MIT license by OpenAI (The company behind ChatGPT). Whisper is quite light-weight, and can be run locally. It also offers quite a range of different sizes and possibility to “fit” the model with your own data.
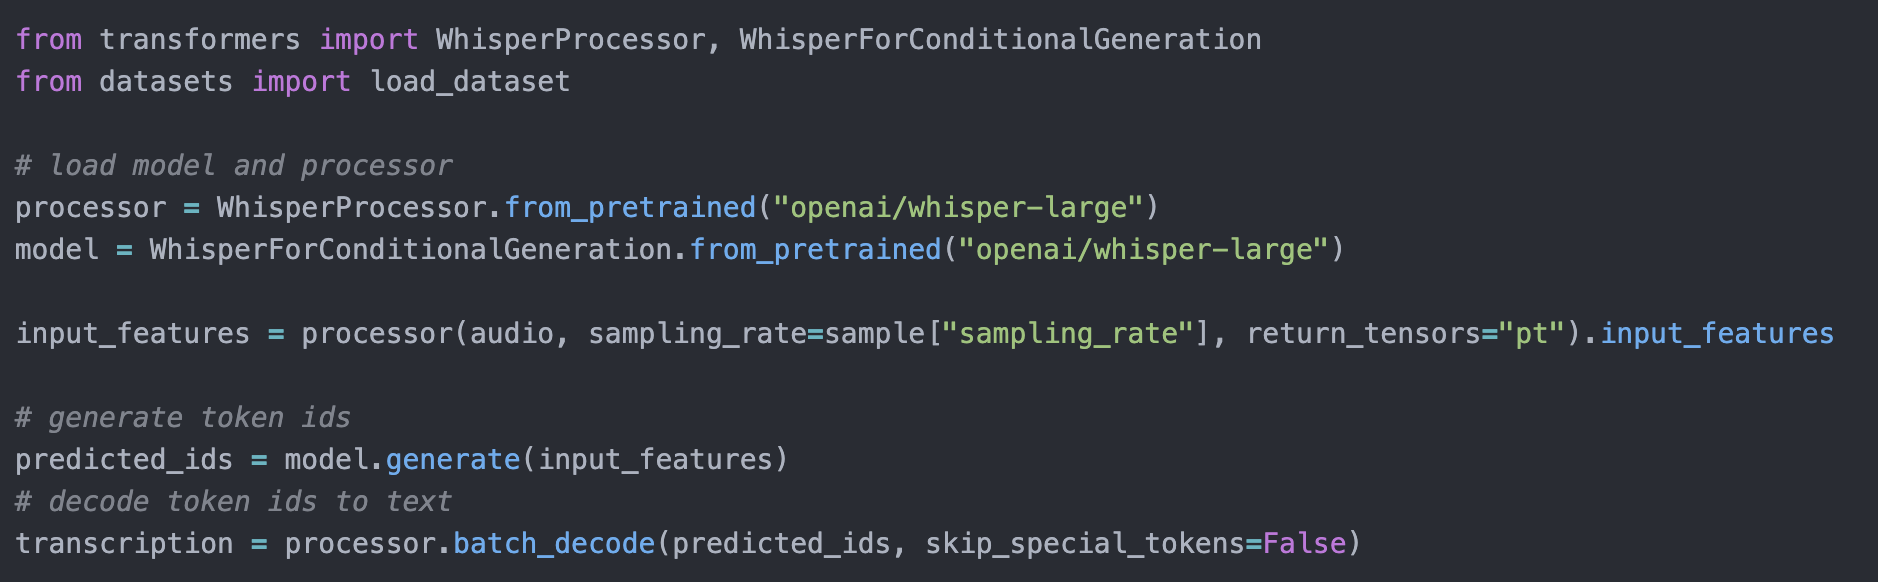
With a few lines of Python code we achieved a script that took in the path to audio, and then returned a text file with transcript. But there is a problem. Meeting recordings are usually kept in video format while Whisper works with audio files.
Lesson Two: Make it work before you make it shine
Thankfully, Python has quite a lot of libraries and packages to use. After quick search we found moviepy library. Thanks to it, we were able to turn movie files into an object, that stored audio as a variable.
Don’t be afraid to just plug in different libraries, even if its job is as limited as extracting audio (moviepy has a lot of other uses). Once you deliver what is required, use the leftover time to simplify, optimize, and cut out third parties.
Now we can pass a video file path, get audio from it, and pass it to Whisper.
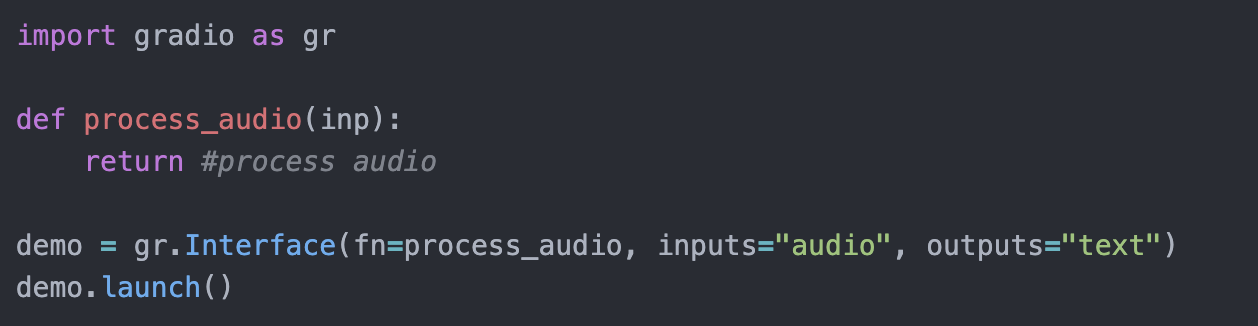
Since our scripts work, now we needed UI. Our decision was to use Gradio. This library is a default for writing a quick and nicely looking UI for your AI projects. On homepage of their website you can see working PoC’s created in just five lines of code (quite literally).

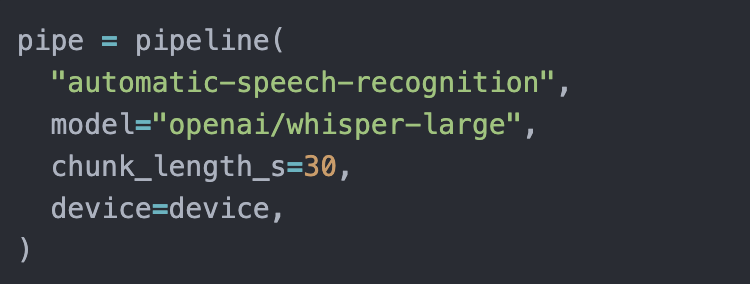
We also figured out that our current Whisper implementation works on 30 second chunks of audio. Another search showed that HuggingFace solved this problem already. So we switched implementation to use pipelines from HF. They handle chunking audio under the hood, and return nicely prepared object with text chunks, timestamps and full transcript.
At this point it was a nicely working PoC. But we still didn’t know who was speaking, and when.
Lesson Three: Working with audio doesn't require an audio engineers degree.
Before we proceed, there are two terms to explain. Those terms are Segmentation and Diarization.
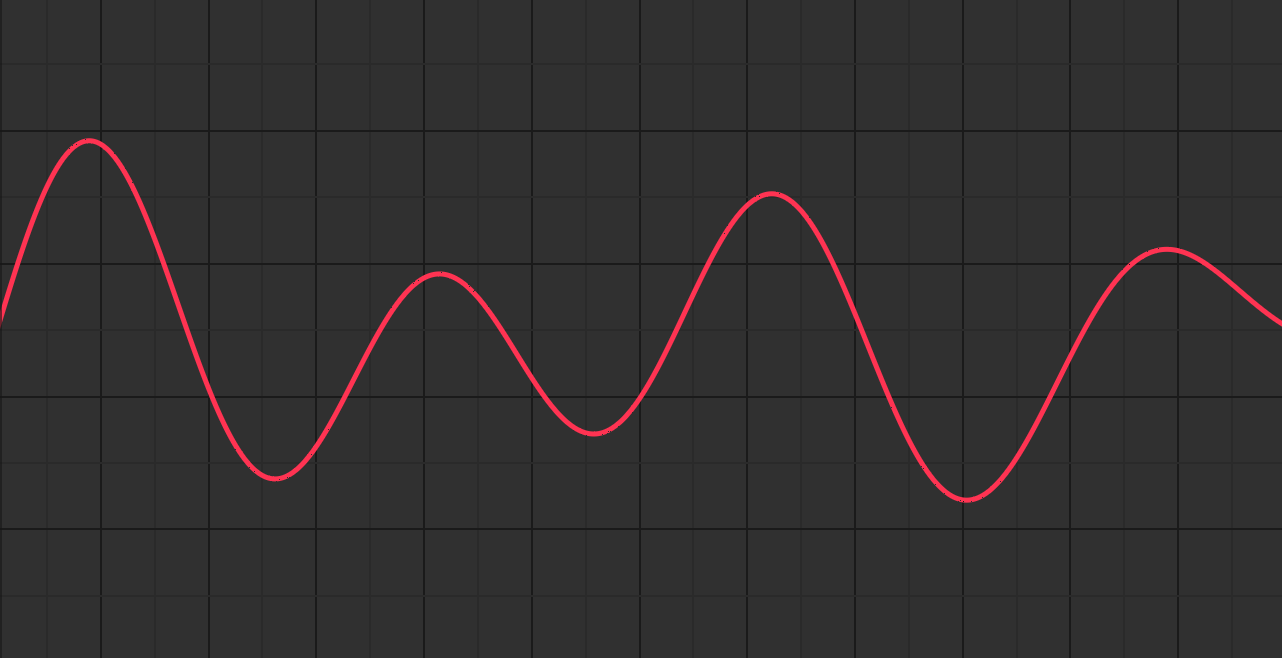
Segmentation is a process of analyzing an audio file and separating it into its own components. Audio consists of various waves with different amplitudes and frequencies. Unlike a setup where each speaker has a dedicated track, audio files typically record all voices together in a single track. Segmentation, in simple terms, is untangling these tracks (using algorithms like Fast Fourier Transform).
It’s like listening to music: you hear all of the instruments playing together; segmentation helps to recognize and separate each instrument.
We won’t be implementing anything from scratch; we will be using a library called pyannote.
As pyannote’s segmentation works with 10 second audio chunks, after this process we have a lot of chunks with untangled waves. Continuing the musical metaphor, a lot of chunks with separated instruments. But how can we be sure if the guitar from chunk X is the same as the guitar from chunk Y? That part is solved by diarization.
Diarization is a process that takes in all of those segmented audio chunks, and analyses it further. It takes the audio chunk and identifies unique characteristics or patterns associated with each instrument, like how a violin sounds. To do that, it uses machine learning model that specializes in extracting “features” from an audio sample, then it searches for that violin sounds in other chunks. After it went through all of the chunks we get back information about which instrument played when. In this metaphor, the instruments are our speakers. And instead of sounds or music, it’s their voices and speech patterns.
After diarization, we get a full view of who and when was speaking. Diarization doesn’t cover what was said. So we still need to figure out how to connect that with transcription.
Lesson Four: There are always multiple paths to your goal
At this point we have a couple of building blocks that we can use. It’s time to figure out how to connect them. Whisper gives us a transcription of an audio, but has no idea who and when was talking. Diarization gives us this information, but not what was said.

Now be aware that what we decided to go with doesn’t have to align with your needs. We wanted to be able to make transcriptions with additional goal in mind. That goal is preparation of dataset. It’s not a main goal, but having it in mind while planning out interface and interactions, we can prepare for editing transcriptions, and easily exporting the data for training. After inspecting datasets from HugginFace we knew that the dataset is a bunch of objects with audio and transcription.
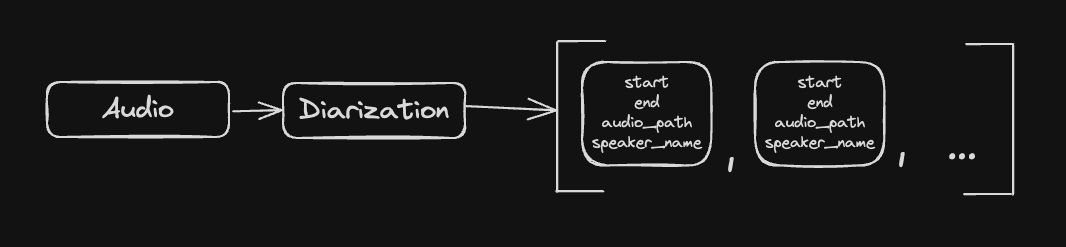
With that knowledge, we decided for two iterations. First iterations takes diarized audio chunks, and from the timestamps information it “cuts” the main audio file into smaller parts. It also appends an object to array, this object has path to the file, timestamps and information about the speaker. After first iteration we have an array with objects that have: start, end, audio_path, speaker.
Now we iterate over that new array, but this time we take the audio path, and pass it to Whisper.

So as a result, our array has: start, end, audio_path, speaker, transcript
We could stop here, and wrap up the app - drag and drop video, receive a text file describing who, what and when said. But now that we made it work, it’s time to make it shine.
That’s also when the problems started.
Lesson Five: Gradio is great for demos but not for production
The first problem came from UI. We usually use React, and in React, when we want to display an array, we prepare a component, and then render it in a list on the screen. This does not work like that wth Gradio.
It turns out that Gradio is implemented in a way that requires all of the components to be declared at the start of application. If you’d like to have dynamically appearing and dissapearing components, you need to first declare them with attribute “hidden” set to true, and then dynamically change that attribute. But we have no idea how many of those components we want to display, and setting hard limit seems risky.
.png)
Thankfully this problem was solved with UI redesign. There is nothing that can’t be solved with proper planning and thinking. Even though Gradio does require some time to properly sink in.
Additionally, there was a problem with using global variables while writing the app. But turning them into session variables seemed like a daunting task at this point, so it stayed that way.
It turned out it’s surprisingly easy to add loaders and proper feedback to users. So after an extra couple of hours, our app was not only looking good, but also gave user feedback about what is happening under the hood.
Lesson Six: Diarization is a complicated process
Having all of UI and other flows in place we started testing. And to our surprise, diarization is not a short process. We use MacBook Pro with Apple M1 and as a rule of thumb it takes 1 minute for every 2 minutes of recording. So 1:2 ratio. Which is not bad, it’s something to take into account.
Another thing is a case when people talk over each other, or accidentally turn on microphones. With current implementation, diarization often showed a lot of “turns” that took less than one seconds and nothing was said. Diarization also took couple of longer speeches and returned them as separate “turns.” Thankfully, there’s a built-in function “support” to glue those turns together.


This “support” function takes in a parameter called “collar.” It specifies how close two speaker segments can be in terms of time before the are considered the same turn.
Lesson Seven: Transcription is a complicated process
Eventually, I’d like to discuss the quality of transcripts and our findings when testing out different sizes of Whisper models. As it turns out, Whisper has problems with some accents. And since our company has employees across many countries, we have a lot of accents even when we all speak English. Whisper model was butchering a lot of names and internal processes, it is not really production ready in the current state.
To our surprise, base Whisper model (2nd in size, right after small) performed really well both in terms of speed and quality of transcripts. With a few modifications in our scripts we were able to make a sort of “framework” for running tests using “WER” as a metric (Word Error Rate).

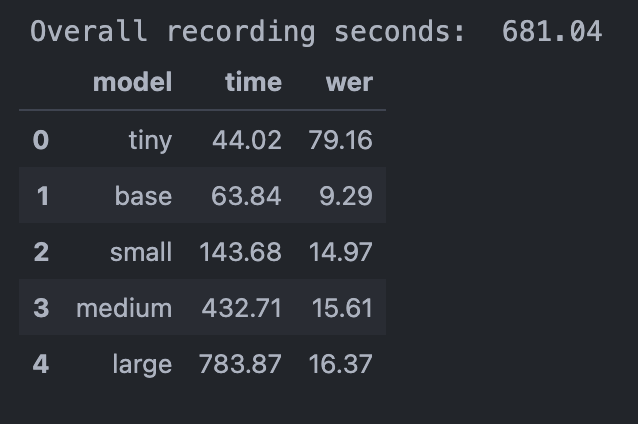
But seeing these results seemed suspicious. Why did such a small model perform that much better than its bigger versions? So we also learned that our approach to test was flawed from the start.
We first generated transcript using base model, then fixed it manually to match what was said, and treated that as our ground truth. Why was that approach flawed? Because at the end of the day we compared results from other models to “fixed transcript of base model” instead of manual transcript. As a result, we received a deviation from base transcript instead of solid comparison between all models. So yeah, our tests were biased, but we still learned from them.
We found that a small model has a tendency to loop. Certain phrases were written multiple times, for some unknown reasons.
We also learned that even though it should be possible to fit the model to our accents or words used in our company, it would be a rather expensive process. A great article we followed to learn about fitting mentioned that with dataset of around 5h it takes between 5 to 8 hours on processing units from Google Colab. And at this point we had neither time, nor data to do that.
Conclusions
We didn’t start this journey hoping to conquer the world of transcriptions but to learn a lot. And we did. This is what we learned:
- Proper priorities can save you a lot of time at the beginning of the project.
- It’s faster and easier to use libraries than to spend time creating your own solutions.
- Segmentation and diarization aren’t as scary as they sound.
- Proper planning while working on UI is very important.
- Not every UI library is production-ready. It’s easy to change libraries that have small responsibilities, but it’s not that easy to rewrite UI.
- Just because the AI model (or any other solution) works out of the box, it doesn’t mean it will perfectly work with your needs. So whatever you choose, testing is very important.
- When working with AI it’s very important to have human-made datasets. It’s not always the case, but using transcriptions generated by AI to test the quality of AI creates a feedback loop.
In the end, we’ve managed to build a basic meeting transcription tool using PyAnnote Speaker Diarization & Whisper models. We published the source code in the repository.
This article is just the beginning. We're diving deeper into our AI experiments, and it'd be awesome to have you tag along for the ride!
Meanwhile, you can explore fine-tuning Whisper for multilingual ASR with 🤗 Transformers in the Hugging Face blog post or discover how to transcribe your audio to text for free with SRTs/VTTs using OpenAI Whisper. They are really useful reads.

