This is a summary of the talk I gave at App.js on 4th April 2019. You can watch the full talk in the video link below. You can also view the whole presentation.
I am a core contributor to React Navigation and React Native Paper, as well as the author of libraries such as React Native Tab View. I hope my experience with working on them can be helpful to you.
When I say component library, I refer to a collection of reusable components. By using a component library, you reduce extra boilerplate in your app and can get productive faster. It’s very common to follow a style guide when designing a component library, resulting in a consistent design across your apps.
Building a library can be very different from building an app. In apps, most of the time we can hardcode certain things. Libraries tend to be more generic because we don’t know all of the ways the user is going to use the library.
Cross-platform
A promise of React Native is cross-platform development. Lots of people come to React Native, so they can write a single codebase and use it for multiple platforms. But cross-platform development is not easy. Apart from the design, there are many other fundamental differences between platforms that we need to address when writing cross-platform code.
Overflow
One of the biggest examples is overflow behavior. On Android, <rte-code>overflow: hidden<rte-code> is the default, on iOS, <rte-code>overflow: visible<rte-code> is the default. This can be very tricky, so the best way to handle this is to always assume that overflow is hidden by default when working on cross-platform components.
In recent versions of React Native, you can actually set overflow to visible on Android, but gestures such as touches won’t work in the overflow region.
Text background
Another difference is that, on iOS, text elements have an opaque background color by default for improved performance. It works fine on solid backgrounds, but not when you have a background image, for example. You can explicitly set it to transparent to avoid this behavior when needed.

Touchables

The other difference is the Touchable components. On iOS, touchables such as buttons tend to change the opacity when pressed, while on Android 5 onwards, there’s a ripple effect. Unfortunately React Native doesn’t provide a single touchable which has appropriate behaviour based on the platform, so you’ll need to build your own component which renders the appropriate touchable.
To avoid repeating this every time, you can use the react-native-platform-touchable library made by Brent Vatne. It renders a ripple effect on supported Android versions and an opacity effect on iOS and unsupported platforms.
In react-native-paper, we have a similar component which renders a ripple effect or a highlight effect based on the platform. We also have a separate touchable implementation for the web which renders a ripple effect similar to Android.
Elevation and Shadows
Next difference is that there’s no support for shadows on Android. Instead, there’s an elevation style which maps to the native elevation property. Elevation refers to the position of the element in the z-axis. The higher the element is, the bigger its shadow.
Basically, it renders a predefined shadow based on material design guidelines depending on the value you provide. There’s not much to customize. Elevation also affects the position in z-axis similar to z-index, so you have to be careful when using it.
To handle this inconsistency, I like to have a single shadow function which calculates shadow properties for iOS and web, based on the elevation value. Here’s a very rough implementation in the slide. In react-native-paper, we have a more robust implementation which produces a more accurate result and handles animated values as well.
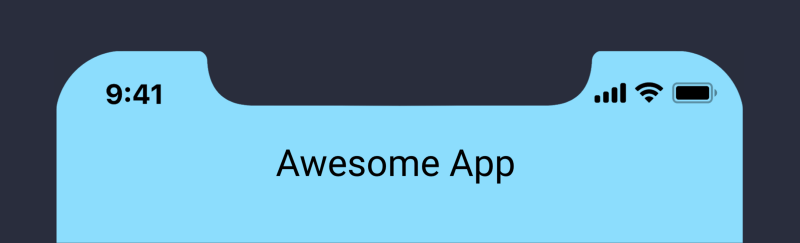
Notch and StatusBar
Handling the notch is always annoying when writing a library. In React Native, the notch is handled by <rte-code>SafeAreaView<rte-code>. Older iPhones and many Android phones don’t have a notch, so we have to handle the status bar height.
A common example is that we have a header in the app and we want it to appear below the translucent status bar. But we also want to add top padding so that it doesn’t overlap any content such as the header title.
Every app can have a different StatusBar/Notch height based on the platform, iOS version, whether translucent status bar is enabled on Android or not, etc. There’s no single cross-platform API to get the status bar height. There is a <rte-code>SafeAreaView<rte-code> API, but it only supports iOS 11+, and can be troublesome when you’re animating views containing the safe area.
Currently, we have some custom logic in react-native-paper to try and guess the status bar height. We take into account whether the user is using Expo, Android or iOS, and apply the default heights for those environments. On iOS 11 and above, we use the available SafeAreaView instead. We also have a prop to let the user manually override this value. This approach is not perfect. The value we guessed might be often wrong, and we are using a constant value even if the status bar height can change over time. But this is the best we can do right now.
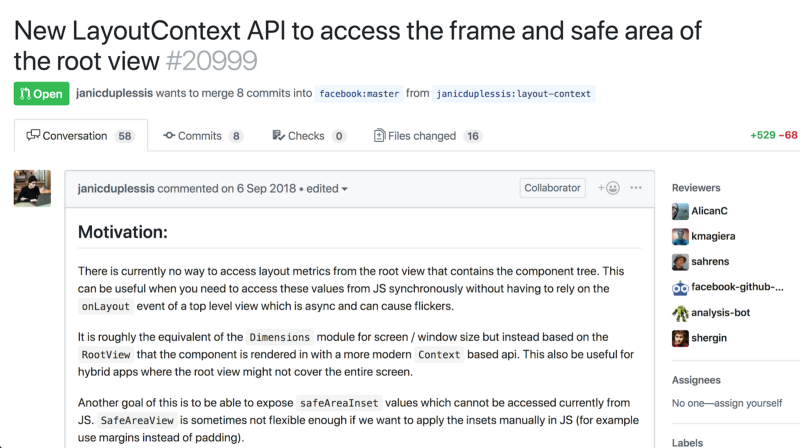
Fortunately, there’s this pull request opened by Janic which adds an API to get the height of the Navigation bar at the bottom and the StatusBar on both Android and iOS. So look forward to a much easier way of handling Notches and StatusBar in the future.
Platform-specific code
When it’s not possible to have a single implementation for all platforms, there are different approaches we can use to provide platform-specific implementations. One of them is by android, iOS or native extensions in the filename.
Sometimes it’s not possible to support all platforms. But when we’re using the file extension approach, we should always provide a fallback implementation, even if it renders nothing. Why? For example, say 9 out of 10 components in the library work on all platforms, but one component has platform specific implementation. If we don’t provide a fallback for this component, it becomes impossible to use the whole library for that unsupported platform.
Metro looks for specific extensions like ios.js or android.js, then more generic native.js, and then just .js. We can take advantage of this and use the most generic extension as the fallback, and have platform specific implementation in the files with more specific extensions.
The other way is to use the <rte-code>Platform.select<rte-code> API. When using <rte-code>Platform.select<rte-code>, we can use the default key to provide a fallback.
There are a lot more other platforms besides Android, iOS and Web:
- Windows
- TV OS
- Mac OS
- Tizen
- Many more...
The main 3 platforms I try to support are iOS and Android and Web. With awesome tools like Expo starting to have web support by default, it’s much easier to support web in your app.
The key to supporting multiple platforms is to prefer JavaScript modules when possible as opposed to native code. Sometimes JavaScript code doesn’t provide the same experience as native, but when it does work, we can support multiple platforms and make the modules easier to maintain because we have a single implementation instead of 3 different implementations.
The last thing I’ll say is, always test on all supported platforms. No matter how confident we are, there’s always be going to be inconsistencies, and it’s more work to fix if we find the bugs late.
Need to conduct React Native training in your company? Talk to us!
Responsive Design
Responsive design is a pretty big thing on the web. But we don’t talk about it in React Native often, and it’s ignored in many apps. I see a lot of apps locking their orientation to portrait and it makes me sad.
There are many other features which won’t work properly if the app is not responsive. For example:
- Screen orientation
- Split screen
- Free-form window mode
In split-screen mode, the user can render apps side by side. Another one is free-form window mode, mainly useful for tablet devices and Chromebook. Here the app windows can be freely resized like a desktop app window.
Today in React Native, it’s not easy to build responsive layouts. The available APIs don’t encourage building responsive layouts, and it’s often a magnitude easier not to make the UI responsive.
But there are some basic rules we can follow to make our layouts responsive,
- Avoid <rte-code>Dimensions<rte-code> API
- Use flexbox when possible
- If you really need layout, use <rte-code>onLayout<rte-code>
- Keep in mind that <rte-code>onLayout<rte-code> is async
Sometimes you do need the layout, for example, to do some calculations or conditional logic., React Native also has an onLayout API that you can pass to a View to get its layout. Just keep in mind that this is asynchronous, and you might need to do something like fading in the content after the layout is available for better user experience.
I had a similar issue in my tab view library, where I need to know the width of the tab view to render screens side by side. I didn’t want to fade in the content and wanted to make the wait for the layout invisible to the user. So I did some trickery to achieve this.
On the first render, I only render one screen and position it absolutely. This doesn’t require me to specify any width for the screen. When the layout is available, I remove the absolute position and use flexbox to position them. This is entirely transparent to the user.
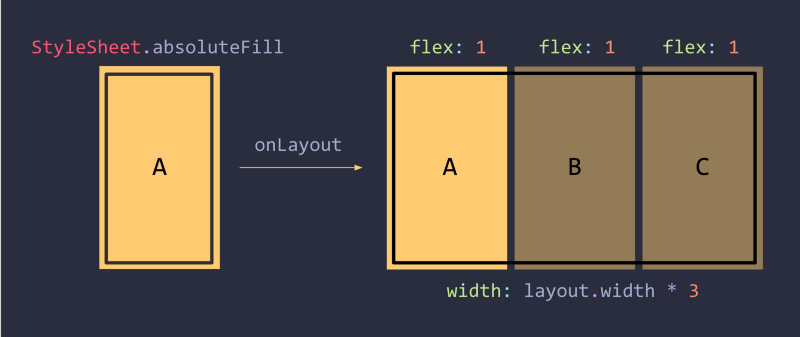
As you can see in the GIF, the tabview renders normally and supports changes in its layout, such as orientation. I’m sure you can also come up with more such tricks for your apps.
Accessibility
Accessibility is another important aspect to focus on. Accessibility simply means building to optimize access. We should be inclusive about giving equal access and opportunities to everyone wherever possible. Many people rely on assistive technologies to use apps and websites. If our apps are not accessible, we’re making it impossible for them to use.
Component libraries are building blocks, so it’s crucial to have them accessible by default. If the building blocks aren’t accessible, the app built with them won’t be either. This is why we are taking accessibility seriously with React Native Paper.
Let’s talk about some of the common disabilities.
Visual impairments
- Blindness
- Low-level vision
- Color blindness
Hearing impairments
- People with low or no hearing ability
- Language disorders
Mobility impairments
- Physical issues
- Neurological or genetic disorders
I’ll mostly talk about visual impairments because that’s what we deal with most of the time when building apps. People with visual impairments often use screen readers to interact with apps. A screen reader lets them know what’s on the screen and allows them to interact with the app via certain gestures.
Most operating systems have built-in screen readers:
- TalkBack on Android
- VoiceOver on iOS and Mac
- Narrator on Windows
- Orca on Linux
- ChromeVox on ChromeOS
- Many more…
The best way to know if our components work with screen readers is to try to use them with screen readers. We can use the built-in screen readers in the OS to test our components on various devices. On iOS simulator, we can use the Accessibility Inspector tool provided with XCode.
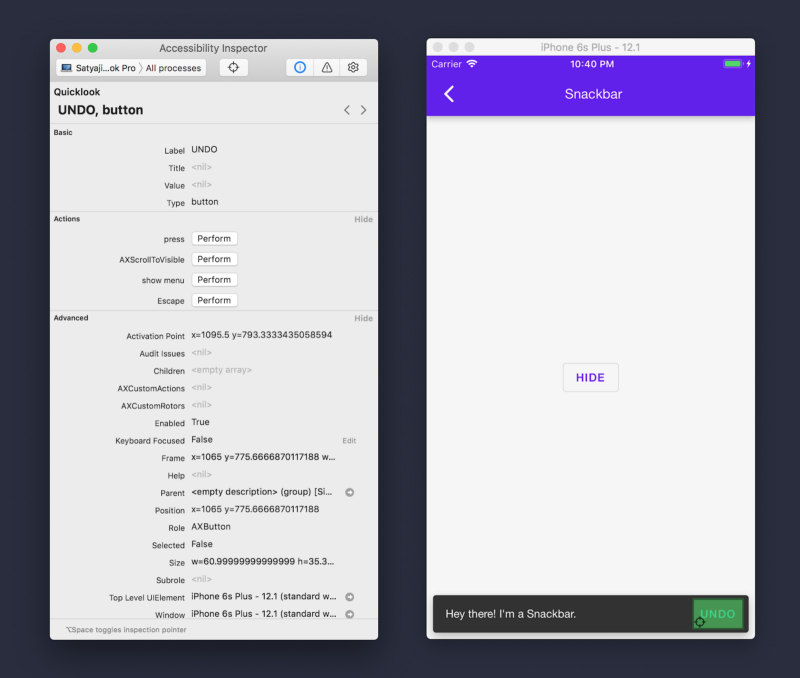
Accessibility inspector will show all of the attached accessibility related info regarding a particular element. For example, here, the inspector is showing that our button has the appropriate accessibility role of the button and its label is “undo”.
React native provides several APIs to add accessibility related data. Such as <rte-code>accessibilityLabel<rte-code>, <rte-code>accessibilityHint<rte-code>, <rte-code>accessibilityRole<rte-code>, <rte-code>accessibilityStates<rte-code> and more.
To ensure accessibility by default,
- Use semantic elements and appropriate roles
- Use captions for media such as images, and videos
- Make your web app accessible to keyboard users
- Use enough contrast for colors and test for color blindness
Right-to-left languages
We just talked about making our components accessible. This also includes people who use a different language, which gets us to “right to left languages”, known as RTL in short. What is RTL? When we write english or polish, we write and read them from left to right. But there are many languages which are written and read from right to left.
In a region with an RTL language, books open from the right-hand side. Similarly, most UI elements are mirrored when using an RTL language.
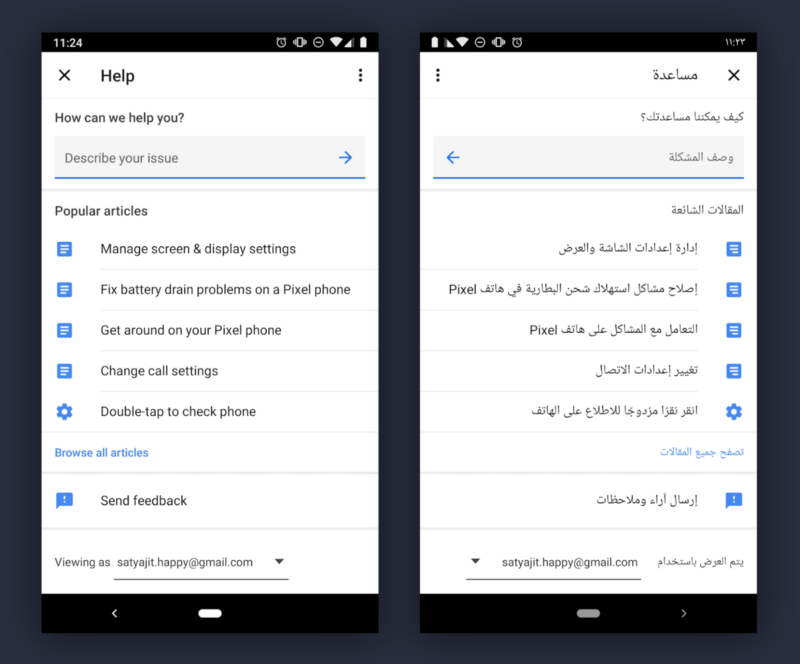
Here is an example screenshot in an Arabic script. Most UI elements are flipped here, the icons are moved to the right, the text is aligned to right instead of left, etc.
In most cases, React Native automatically handles RTL for us when we’re using flexbox. There will be some cases where we might want to handle it manually. React Native provides all the necessary APIs to test and implement these.
The <rte-code>I18nManager.forceRTL<rte-code> API changes your app to render in RTL mode so you can see how everything looks when using RTL languages. When you call this API, you’ll need to close your app and open it again.
The <rte-code>I18nManager.isRTL<rte-code> API is a boolean that tells us if we’re in RTL mode. We can implement RTL specific UI changes using this API.
Keep in mind that you would need to restart the app for RTL related changes to take effect.
Linking
This one is every React native developer’s favorite, linking. If a library includes native code, we often need to link it to use it. But unfortunately, it doesn’t work properly with many libraries.
So, if you’re building a library, always test that it works properly with <rte-code>react-native link<rte-code>. It’ll save many developers countless hours of struggle.
Fortunately, soon we’ll be able to have the ability to link libraries without any work on the user’s part.
Documentation
Documentation is one of the most important parts of a library. Good documentation makes happy users. However, writing and maintaining documentation can be a lot of work.
I love to automate things that can be automated. With the limited time I have, the fewer things I have to worry about, the better. I like generating documentation from code because it reduces the amount of work we have to do as maintainers, and there’s way less chance of the documentation getting out of date from the actual code.
It’s true that a lot of generated documentation is really bad. In my opinion, it’s not because they are generated, but because they don’t receive much attention. Even though I’m a fan of documentation generation, I like to write detailed comments for specific props so it’s actually understandable. Some topics require more detailed guides, which I like to put them in their own files.
Approaches
- Extract code comments with React docgen
- Write documentation in separate markdown files
- Document props with code comments + detailed guides in markdown files
For React Native Paper, we follow this hybrid approach, where we extract documentation for props from code comments and flow types using react docgen, as well as writing guides for broader topics.
Our code comments look kind of like this. There are flow or typescript types with comments that will be extracted to the documentation pages.
Tools
When writing documentation, another important thing is to provide runnable playgrounds. This lets users quickly try out components, and also makes it easier to report issues.
Online playgrounds
Each of our code snippets in the usage examples have a “Try on Snack” link which loads that example in a full editor on Snack. It’s pretty easy to implement too, you can pass the full code in a query param to the snack website and it’ll load it in the editor.
Static types
Static types are great. They help me by providing autocompletion and checking errors in my code. You should definitely use them in your project.
So, there are 2 popular static type checkers, Flow and TypeScript. Both have their own advantages. I’ll quickly compare both so we know which one is better for building libraries.
Flow
Flow is not 1.0 yet. It has breaking changes in each release. It means it’s a lot of work to keep it working every release. Due to this reason, React Native versions are coupled to specific Flow versions. So there are a lot of cons:
- Breaking changes in each release
- React Native versions coupled to Flow versions
- No good workflow for libraries
There is also no good workflow for supporting multiple Flow versions except publishing on flow-typed. This would’ve been okay if there weren’t breaking changes each release, but right now the reality is that it’s not always possible to support multiple Flow versions with a single definition.
Even if you’re willing to publish definitions to flow-typed, it’s a lot of work, and Flow doesn’t support extracting type definitions from your existing code.
None of this would be a big issue in apps. But when working with libraries, we need to support different kind of projects which will have different versions of Flow.
TypeScript
TypeScript is stable and rarely has breaking changes. Other advantages include:
- Stable and less breaking changes
- CLI extracts definitions from source code
- IDE provides intellisense even when a user doesn’t use TypeScript
There are of course many other differences, but these are the main things that stand out from a library development point of view. To me, TypeScript is a clear winner for libraries. We used to use Flow in React Navigation, but due to all the issues we removed it, and we want to migrate to TypeScript soon (pull request welcome by the way).
What’s more? Metro supports compiling TypeScript by default in the generated app, so there’s no reason not to use TypeScript.
Code quality
For ensuring code quality, I like these tools:
- Test runner: Jest
- Integration tests: Detox
- Unit tests: React Native Testing Library
- ESLint to find potential issues
- Prettier for code formatting
- Husky for pre-commit checks
- CommitLint to enforce a commit message convention
- CircleCI for continuous integration
Publishing
So we have made sure of everything. How do we get this amazing library into the hand of users? It’s time to publish the package to npm.
Our libraries have a lot of files. Code, configuration, documentation, tests and many more. But we don’t want to publish all the files to keep the install size minimal.
What to publish?
- Source code for Metro (React Native)
- ES modules build for bundlers like Webpack
- CommonJS build for everything else
- Type definition files
There are 2 ways to tell npm what to publish, npmignore field where we list the files we don’t want to publish, and the files field to list the files we want to publish. I personally prefer to use the files key to keep things explicit.
If you have a React Native library, all you need to do is install @react-native-community/bob, and run yarn bob init to configure your project. Checkout our blog post to know more about Bob.
Publishing can be a lot of work. We have to create a tag, create a release on GitHub, publish a changelog and finally publish the package to npm. I use a tool called release-it which automates all of these.
You can even use it on the CI to publish a new version automatically on every commit to master. There is another tool called semantic release which is very similar.
Contact me
One last thing. Remember, it’s easy to add a new feature, but hard to remove it. Don’t put everything in your component library. It’s okay to write custom components for specific use cases.
You can tweet me if you want to chat about this topic or want to get started with contributing to Open Source. If you want to work with me, be sure to apply on our careers page. You can also check out services offered by our React Native development company.


Learn more about Scalability
Here's everything we published recently on this topic.