.webp)
Setting up GraphQL With Hapi.js
In short
This article guides you through creating a simple server with MongoDB and Apollo Server using GraphQL and Hapi.js. It covers setting up a server, connecting to MongoDB, defining a GraphQL schema, implementing resolvers, handling mutations, and adding the GraphQL endpoint with GraphiQL documentation. The tutorial provides a step-by-step approach to building a GraphQL API with Hapi.js.


Super simple server with MongoDB and a new Apollo Server
In my last few projects I’ve been working a lot with GraphQL on the client side and I started wondering about how it would do on the backend. I was communicating with servers by constructing simple queries and mutations, sending and getting only the data I wanted, and the entire API was really well documented (thanks to GraphiQL). First questions that occurred to me were: “How complex is that?”, “Is it easy to write an API like that?” and “How long would it take to achieve that result?”. So I decided to dive deeper into the dark side of GraphQL, and quite quickly realized that it’s really fun to work with.
In my career as a developer, I’ve created a few JavaScript APIs and found Hapi.js to be my favourite technology. It seems more mature than Express and promotes declarative approach where your app is described as a set of routes. While most of you will stick to Express or Koa when designing GraphQL APIs I would like to help those who are addicted to Hapi. I found out that it’s not that well documented, and though you can find some examples around the internet or Apollo docs, I thought it would be useful to group it nicely in one place.
Here's a working example created with this tutorial.
A simple server
To run everything properly we should prepare a simple server. We’ll do this within the index.js file on our root folder.
For now we’ll not expose any routes, just install dependencies and make sure that our server works.
MongoDB connection
Ok — time to connect to some databases! I personally prefer MongoDB with mongoose, but you can use any database you like. That’s one of GraphQL’s most amazing features — you can create a unified structure over multiple databases and REST API’s. In this tutorial I’ll show you only a simple mongo connection, but you can head to GraphQL’s documentation to see how to connect gql with different services.
With just a few lines added to our index.js file, we have now our app connected to the database.
Also it would be good to create simple model for user within our app:
NOTE: Remember that you need to have MongoDB installed on your machine, or provide an external database URL to make this work.
GraphQL Schema
At the beginning, we need to think about our schema. It defines our application structure — relations, types, queries and mutations. Our first step will be creating a schema file with a simple user within it.
For now, I’ve placed my schema in qraphql/schema.js file, so it looks like this:
Our schema now contains simple User type, and a query used for fetching data.
And everything is fine this way, but thanks to babel and babel-plugin-inline-import we are able to create a simple schema.graphql file instead of creating and exporting a template string, so our file will contain the following:
And we can import it like:
But since I’ve wanted to keep everything simple within this tutorial, we are not going to add babel.
Resolvers
Now it’s time to teach our server how to respond to upcoming queries and mutations. Each field can have a resolve function assigned to itself. Resolver is a place where our magic happens — we can put any data request here — no matter if it’s DB query, or API request, GraphQL gives us amazing freedom.
In our case we’ll be calling the database to give us some data about user. We need to provide an object that contains keys matching our types. Our resolver will look like this:
Mutations
In the previous sections, we defined some queries that help us access the data — but what if we want to change some data in our database? Mutations are here to help us. Teaching our server on how to use mutations is a pretty easy task. At first, we need to update our schema. Adding a mutation type will be a good start.
Then we need to resolve those requests somehow. I bet you already know where to go.
And that’s all we need to make this simple mutation work. After completing the next step, we should be able to read and write data to our database with GraphQL.
Adding the GraphQL endpoint
Finally — we’re ready to go!
Now we can register /graphql route to our server. Thanks to the amazing apollo-server package we can do this pretty easily. Adding this small snippet into our index.js file will do all the work for us. You can read more about available options in the Apollo docs or apollo-server github repository.
Also thanks to amazing graphql-tools library we can connect our schema and resolvers very easy, you can check example below:
Adding GraphiQL
One of the most amazing things associated with GraphQL is auto-generated user friendly documentation called GraphiQL. This is truly a game changer, as it takes communication between frontend and backend developer to the next level. Even if you’re creating both on your own, this tool is really helpful. The wonderful apollo-server package allows us to create GraphiQL even faster than a /graphql endpoint.
Simply add these lines to your index.js file:
Here is our result.
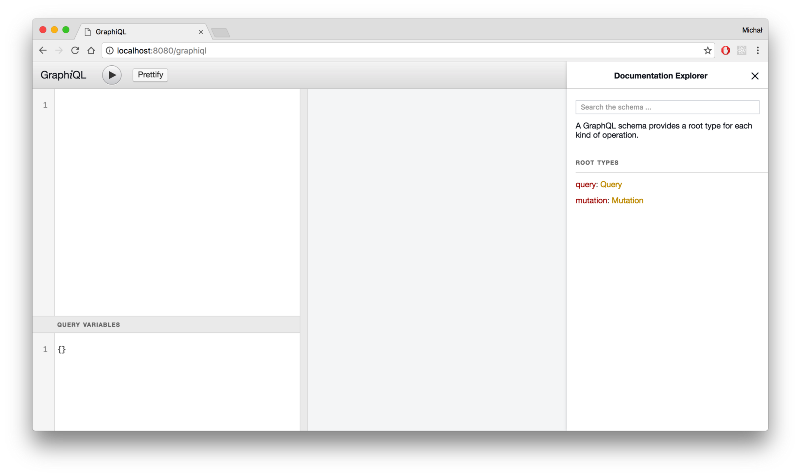
Amazing, isn’t it?
We can see four areas over GraphiQL — input and output, variables area, and docs.
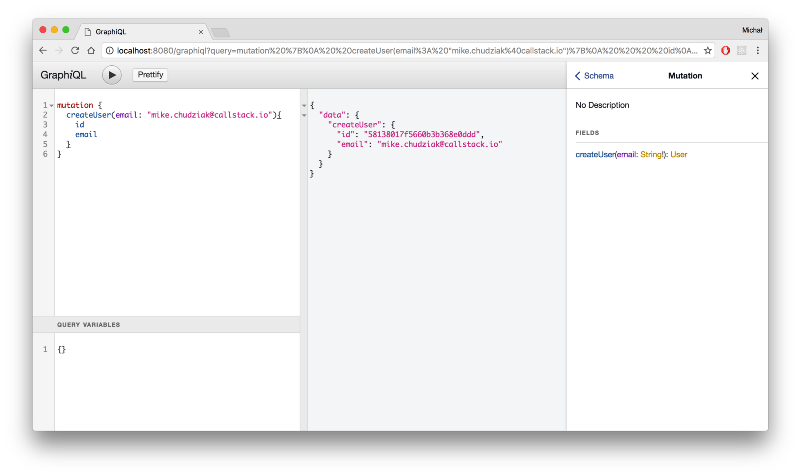
Input and output areas are where communication with our GraphQL server happens. We can enter some query or mutation into the input area like this, and see our app’s response. In addition to that, in the variables area we can provide some test data for our queries and mutations.
Mutation:
Query:
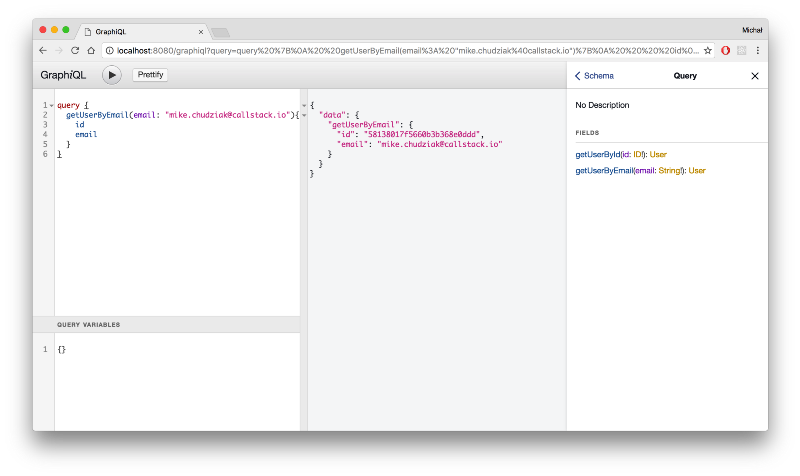
You should also play around with docs to get a feel of how powerful they are!
Conclusion
As you can see, it’s very easy to start your work with GraphQL and Hapi.js. You can start searching the web for some more information about authorization and using GraphQL on top of the REST API. In the meantime, you can get the entire working example that we created in a GraphQL tutorial. If you need a more complex solution, then you should check out this boilerplate that I’ve created with my friends at our React Native development company.
FAQ

By subscribing to the newsletter, you give us consent to use your email address to deliver curated content. We will process your email address until you unsubscribe or otherwise object to the processing of your personal data for marketing purposes. You can unsubscribe or exercise other privacy rights at any time. For details, visit our Privacy Policy.

I agree to receive electronic communications By checking any of the boxes, you give us consent to use your email address for our direct marketing purposes, including the latest tech & biz updates. We will process your email address and names (if you have entered them into the above form) until you withdraw your consent to the processing of your names, or unsubscribe, or otherwise object to the processing of your personal data for marketing purposes. You can unsubscribe or exercise other privacy rights at any time. For details, visit our Privacy Policy.
By pressing the “Download” button, you give us consent to use your email address to send you a copy of the Ultimate Guide to React Native Optimization.