Reanimating Your React Native Experience
React Native is undergoing an outstanding transformation in the way gestures and animations are conceived. Thanks to the excellent work driven by Krzysztof Magiera, with react-native-gesture-handler and more recently with react-native-reanimated, we are one step closer to achieve the same delightful experiences as we’d have in native mobile apps.
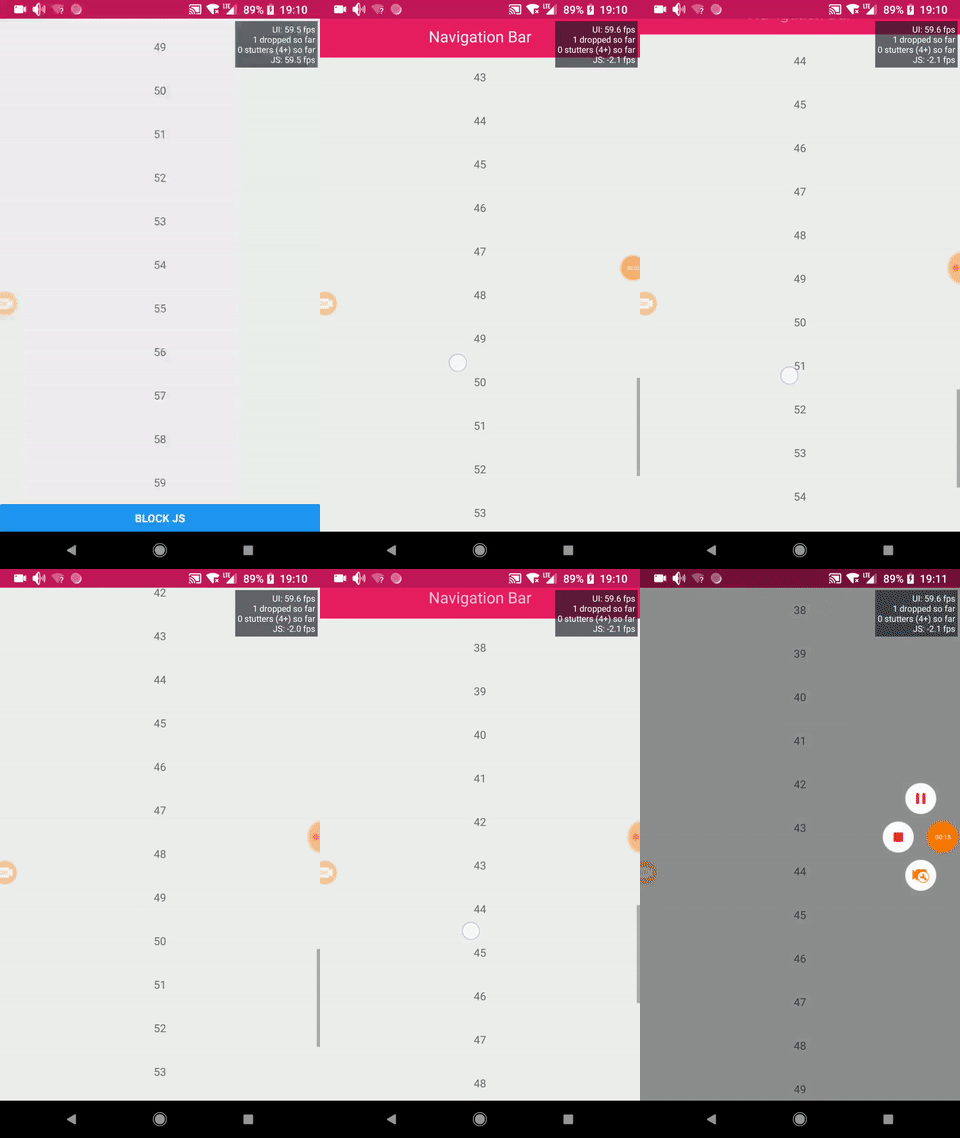
Since a picture is worth a thousand words, take a look at the below GIF:

In case you haven’t noticed, I’ve intentionally blocked the JS thread and everything runs smoothly, even the snapping animation after the finger release. Say whaaat?
Your mileage may vary with Animations in React Native, but the experts will agree that I’ve either cheated or hacked the RN profiler, because they know that can’t be achieved with the current built in infrastructure (aka <rte-code>Animated<rte-code>API)…until now.
If you are super impatient, you can check out the source on GitHub. I still recommend you continue reading though.
React-native-reanimated
Animated library has several limitations that become troubling when it comes to gesture-based interactions. When dragging a box, even though by using <rte-code>Animated.event<rte-code> we could map gesture state to the position of the box and make this whole interaction run on UI thread with <rte-code>useNativeDriver<rte-code> flag, we still have to call back into JS at the end of the gesture for us to start a "snap" animation. That’s because <rte-code>Animated.spring({}).start()<rte-code> cannot be used in a "declarative" manner.
This extract from the README file of the library greatly sums up one important pain point when building gesture based interactions with React Native.
Think about the common collapsible navbar pattern used across different popular apps, such as Twitter or Whatsapp. To implement snapping, we had to do a lot of manual work, due to problems like Animated.diffClamp not supporting adding listeners to it and having to resort to hacky solutions that led to performance issues and more often than not, brittle code.
React-native-reanimated is a (backwards compatible) reimplementation of Animated API, whose goal is to provide us with more generic and low level primitive node types, so that patterns such as the one above can be implemented declaratively and run on the UI thread like a sweet piece of cheesecake.
Ok, enough theory. Let’s reveal the secret sauce I’ve put together to implement the fancy collapsible navigation bar you saw on the GIF above.
Hiding navigation bar with diffClamp
The first part of the implementation consists of showing or hiding the navigation bar, depending on the direction and amount of scroll. It’s certainly not a new pattern, since it’s been explained before in other blog posts and code samples. Still, let’s do a quick refresher.
<rte-code>Animated.diffclamp<rte-code> is the method that allows us to represent the desired behavior. It calculates the difference between the current value and the last and then clamp that value. To better illustrate what it does, let’s throw a table with some numbers. What you see below is the output for <rte-code>diffClamp(0, 20)<rte-code>.
Assuming you got a better understanding, let’s scaffold the UI and hook up the corresponding animated values to make that happen. I’ll be omitting some of the code parts for selectively showing what matters. You’ll be able to check the full source code later on.
Let’s explain what’s going on in the constructor:
- <rte-code>this.scrollY<rte-code> is the animated value that will be driven by the ScrollView <rte-code>contentOffset.y<rte-code>. The mapping is performed by using <rte-code>Animated.Event<rte-code>. The native driver is running the animation on the UI thread, so we are not affected by the JS thread being blocked.
- <rte-code>diffClampNode<rte-code> represents the <rte-code>Animated.diffClamp(0, NAV_BAR_HEIGHT)<rte-code> operation explained before.
- Since we want to hide the navigation bar when scrolling down and show it when scrolling back up, we define <rte-code>animatedNavBarTranslateY<rte-code> as the transformY style applied to it, by inverting the relationship.
- We interpolate the opacity of the title, so that the title is visible when the navigation bar is visible and viceversa.
New concepts
So far so good. We’ve got the barebones of our implementation up and running. Now it’s time to show off some magic. But before that, I’ll kindly introduce some new concepts that react-native-reanimated embraces, so that you can have the big picture.
Clocks
Clocks aim to replace animated objects by providing a more low level abstraction, still behaving as animated values. Animated.Clock nodes are a special type of <rte-code>Animated.Value<rte-code> that can be updated in each frame to the timestamp of the current frame. They are also denoted as side effect nodes, since they are in charge of starting and stopping a process (an animation) that updates the value for some time.
The algorithm that evaluates animated nodes works as follows:
- Each frame it analyses first the generated events (e.g. touch stream), because they may update some animated values.
- Then, it updates values that corresponds to clock nodes that are “running”.
- After that, it recursively and efficiently evaluates nodes that are connected to views (and that have to be updated in the current frame).
- Finally, it checks if some “running” clocks exist. If so, it enqueues a callback to be evaluated with the next frame.
Blocks
A block is just an array of nodes, where each node is evaluated in order. It returns the value of the last node.
If those terms sound confusing for now, don’t worry. I am aware it’s difficult to assimilate them at first, by using just words. We’ll soon refer back to those concepts when getting our hands dirty with more code.
Snapping
It’s time to tackle the 2nd part of the implementation, which is the snapping part.
Detecting the end of scrolling
First, we need to figure out how to detect that we’ve finished scrolling. There are 2 callbacks provided by the <rte-code>ScrollView<rte-code> component that can serve as hooks for that, onScrollEndDrag and onMomentumScrollEnd.
<rte-code>OnMomentumScrollEnd<rte-code> will be called only if we release the finger with certain inertia, whereas <rte-code>onScrollEndDrag<rte-code> will be always called after the end of the gesture. For simplicity, we will focus on leveraging <rte-code>onScrollEndDrag<rte-code>.
Following a similar approach as with the <rte-code>onScroll<rte-code> prop, we can use <rte-code>Animated.Event<rte-code> to map the native event <rte-code>velocity.y<rte-code> to an animated value, that we’ll call <rte-code>scrollEndDragVelocity<rte-code>, and use the native driver.
Android and iOS both differ in the native implementation of the <rte-code>onScrollEndDrag<rte-code> callback, bridging inconsistent values for velocities when the callback is executed on the JS realm. iOS reports a velocity of <rte-code>0<rte-code>, whilst Android shows a very low value for velocity, but different than <rte-code>0<rte-code>.
To circumvent that, we can initialize <rte-code>scrollEndDragVelocity<rte-code> with a very high numerical value and listen for changes, so we’ll know we’ve ended the scrolling gesture when we get a value different than the default one.
With that in mind, we can tweak our previous <rte-code>animatedNavBarTranslateY<rte-code> definition as follows:
Snap threshold
Next piece of the puzzle is to determine which final position the navigation bar should animate to, after the scroll is over. We’ll set the threshold on the value <rte-code>NAV_BAR_HEIGHT / 2<rte-code>. The snapping point is then defined as:
Running the animation
After that, we have to create a function that will run the animation after scrolling. We’ll use a spring-based animation.
Now, let’s take a look at how <rte-code>this.animatedNavBarTranslateY<rte-code> is redefined. If the scrolling is over, <rte-code>neq(this.scrollEndDragVelocity, DRAG_END_INITIAL)<rte-code> will evaluate to <rte-code>true<rte-code>. Hence, the <rte-code>cond<rte-code> node will evaluate <rte-code>runSpring<rte-code> and return its value, which will be assigned to <rte-code>this.animatedNavBarTranslateY<rte-code>.
In other words, <rte-code>this.animatedNavBarTranslateY<rte-code> will be driven by the spring animation and not by the scroll <rte-code>contentOffset.y<rte-code> value at that point.
Remember when we talked about clocks and blocks? Now we’ll see them in practice. Let’s go straight to <rte-code>runSpring<rte-code> return value to see how it works.
The 1st time we call the function, <rte-code>clockRunning(clock)<rte-code> will evaluate to <rte-code>false<rte-code> because the clock node has not been started, so the 3rd argument of the <rte-code>cond<rte-code> node will be evaluated. Since that argument is a block, we evaluate all the nodes in order (which set up the initial state and configuration of the spring animation) and return the value of the last one, which has the side effect of starting a clock node.
<rte-code>spring(clock, state, config)<rte-code> will calculate the position of the animation for the current frame and update <rte-code>state.position<rte-code> accordingly. The next <rte-code>cond<rte-code> will only evaluate if the animation is done, so that we can reset <rte-code>scrollEndDragVelocity<rte-code> and stop the clock.
Finally, we return <rte-code>state.position<rte-code> to the caller, which ends up assigning that value to <rte-code>this.animatedNavBarTranslateY.<rte-code>
If you recall the last step of the react-native-reanimated algorithm, we have a clock running, so a callback is enqueued to the next frame. That will have the effect of going through the block repeatedly, until the clock is stopped, which will occur after the animation finishes.
I am getting quite into details here, but I am doing that so that you can acquire the mental model that react-native-reanimated uses.
Crossing the last mile
We are getting there, but we are still missing one subtle detail. After the snapping finishes, the next time we scroll again we’ll get some weird behavior.
That’s why as soon as we interact with the <rte-code>ScrollView<rte-code> by dragging, <rte-code>this.animatedNavBarTranslateY<rte-code> will be driven again by <rte-code>multiply(diffClamp(0, NAV_BAR), -1)<rte-code>, which was unaware of the amount applied by the snapping mechanism. The table below illustrates the 2 different scenarios we can run into.
To coordinate the two agents that are able to drive the navigation bar position, we can use a new animated value that will be in charge of compensating the amount applied by snapping. We’ll call it <rte-code>snapOffset<rte-code>.
Let’s redefine <rte-code>diffClampNode<rte-code> to account for this new variable:
Once our <rte-code>runSpring<rte-code> function completes the animation, <rte-code>state.finished<rte-code> will evaluate to <rte-code>true<rte-code>. At this point, besides reseting <rte-code>scrollEndDragVelocityanimated<rte-code> value, it also needs to apply the right amount to <rte-code>snapOffset<rte-code> , depending on the point we are snapping to.
And that’s it! We’ve finally got everything right in place. If you want to check the nodes API in details, you can do it by reading the GitHub documentation. Putting all together:
Summary
If you’ve managed to read up until this line, give yourself 10 declarative points!
Because being a declarative citizen is what is all about. We’ve defined all the animation system constraints in the component constructor and send them off to the native thread. No more passes over the bridge were needed.Therefore, we are free to carry out whatever heavy computation on the JS thread, or run an infinite loop (just kidding, don’t do that my dear reader), because we have full guarantees that the animation will run slick.
Last but not least, if you wanna play around with the code, here is the repository on GitHub.
Happy coding!
Learn more about
Animations
Here's everything we published recently on this topic.
We can help you move
it forward!
At Callstack, we work with companies big and small, pushing React Native everyday.


