
Recently there’s been a lot of reports from users saying that the overall installation process of installing fbsdk is rather complicated, especially given the fact it does not yet work with rnpm.
There are two main reasons that make fbsdk incompatible at this point:
- It ships with multiple native packages inside a single npm package. That issue has been raised by the community quite a few weeks ago, but since it was only fbsdk that shipped that way, we have marked it as a community responsibility as it sounded like a very specific use-case,
- It has been set up with CocoaPods in mind, meaning that it does not work when linked the standard way, as featured in React Native docs. The reason for that is the lack of relative header search paths specified in the xcodeproj.
Today, I have spent more than 30 minutes with Mateusz Zatorski setting it up in one of our projects and as a result — I have decided to write a step-by-step guide that, hopefully, will enable you to get it installed without too much trouble. So, let’s get started!
In order to follow the next steps, you will need to have CocoaPodsinstalled. If you haven’t done so yet, you can follow the official installation instructions.
If you encounter any problems during this step, contact us and we‘ll see what we can do to help.
Step 1: Installing fbsdk
First thing we will have to do is install the fbsdk from npm registry. You can do this by running the following command from within your project folder:
Step 2: Setting up our podfile
Once this installation has completed, we’ll need to integrate CocoaPods into our project. This gives us the ability to add fbsdk and any other native libraries that we may need in the future.
You can do so with the following command:
As a result, we should now have an empty Podfile in the ios folder.
Step 3: Adding pods
Open up the Podfile with your editor of choice, and you should see the following:
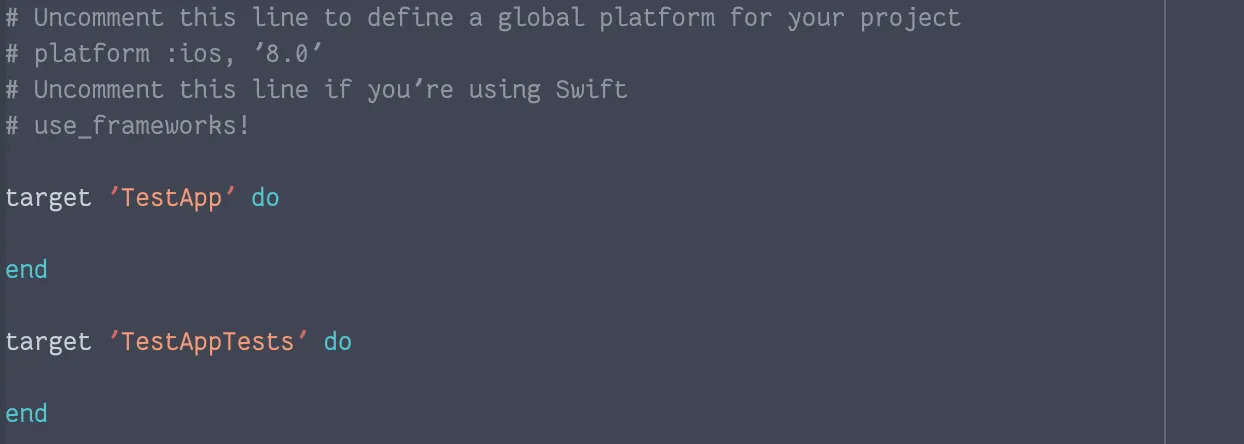
There should be two targets, one is your main target (your app, similar to dependencies) and the second one is your tests (similar to devDependencies).
As you may be guessing, we are going to add fbsdk to the app dependencies as it’s the core functionality of our app.
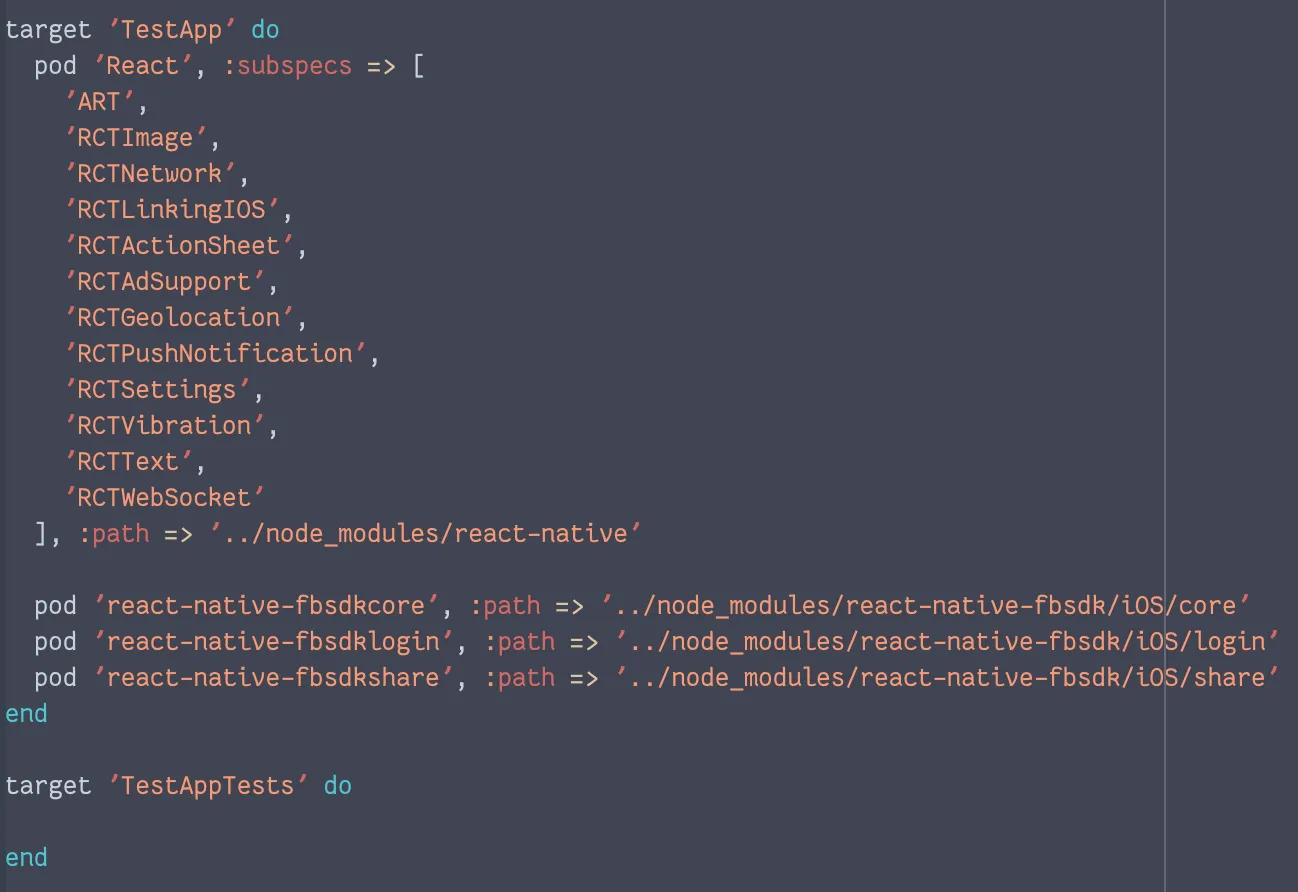
After adding fbsdk, your Podfile should look like this:

Don’t save and leave your editor just yet — we will have to do one more thing in the next step.
Step 4: Adding more pods
Personally, this is the most confusing step in this entire guide. We have to add React Native to Podfile itself. You may be wondering why that’s needed as you already have it inside Libraries group (React.xcodeprojand friends).
The answer is simpler than you may think.
CocoaPods, simply said, is similar to npm 2 — fbsdk defines peerDependency on React Native. Since React Native itself has only been added to our xcodeproj, Cocoapods has no knowledge that it exist. As a result, it will implicitly install React from its own registry — that is stuck on 0.11 since the core team has stopped publishing it since then.
Thankfully, the version we download from the npm registry contains a local podspec (think package.json) we can use to tell CocoaPods that we have React Native installed there.
After adding React Native, your Podfile should look similar to the this:
Note: Some packages like react-native-vector-icons also have their podspec files. If you decide to include these packages that way, don’t forget to also clean them up from `Libraries` as described in next step.
Step 5: Cleaning up libraries
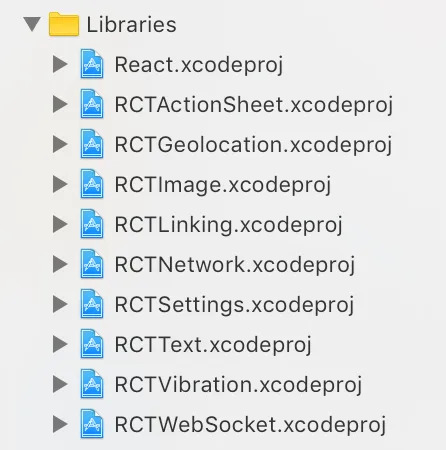
In the previous step we have added almost all the packages from React Native, including Push Notifications (RCTPushNotifications) and Linking (RCTLinkingIOS).
We now have them defined again in the Libraries group as well:
In this step, you will have to do two things:
- go to Libraries group and remove all xcodeproj references that you have in your Podfile (select file, click backspace and select “remove references” option)
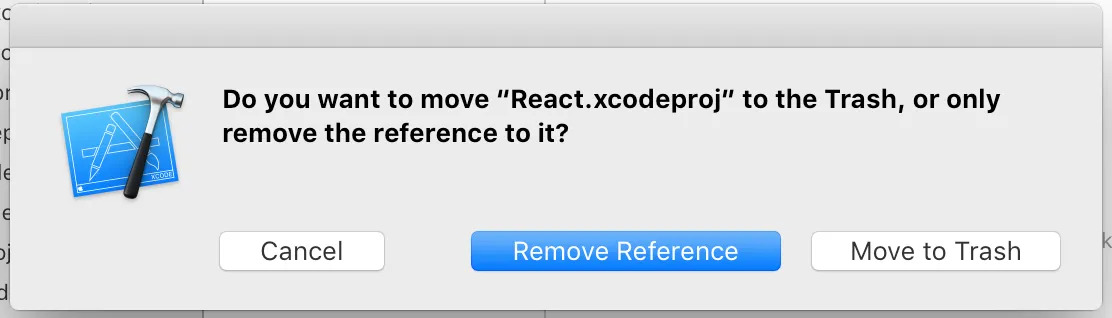
- go to Podfile and remove anything extraneous (for example, if you’ve never used push notifications, you can safely get rid of it).

Once that’s done, close Xcode and you should finally be able to install all the things with:
Give it a minute or two to fetch all the things.
When it completes, you should get two warnings about linker flags (don’t worry, we will fix them in the next step) and a new file: xcworkspace.

From now on, every time you open up your project with Xcode, you will need to choose the xcworkspace file instead of the xcodeproj file.
Tip: Consider adding the following to your package.json.

Step 6: Fixing linker warnings
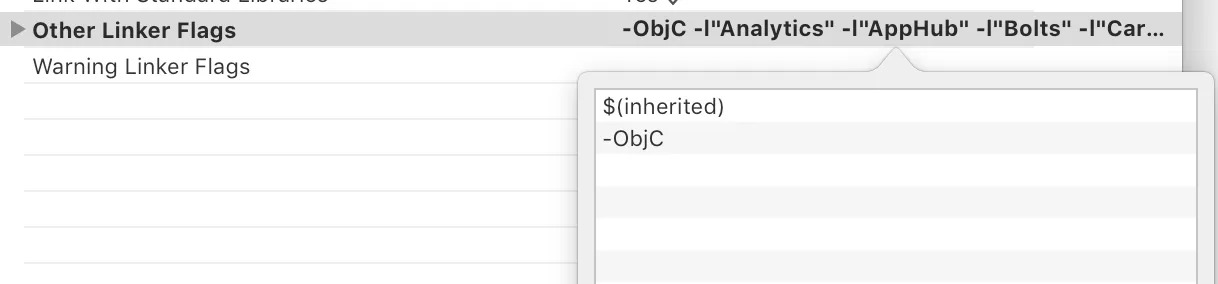
The project created by default with react-native init does not have an $(inherited) flag in your Linker Flags. That will result in tons of errors when compiling your project. If the error message you get says that no symbols were found for the current architecture, chances are you need to redo this step.
To fix this, simply go to Build of your project, find Other Linker Flags and add $(inherited) so that the final list looks like on this picture below:
Note: Every time you run react-native upgrade, you may need to repeat this step. Pay attention to the `git diff` after doing the upgrade.
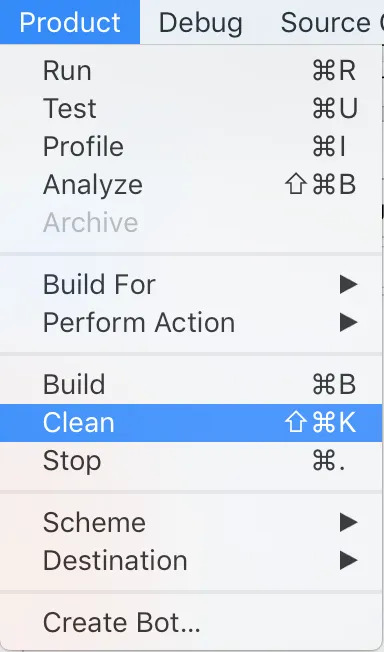
Step 7: Clean up the project
Before we finally hit run — we have to go to Product -> Clean. This will clean the cache and any artifacts left from previous builds.
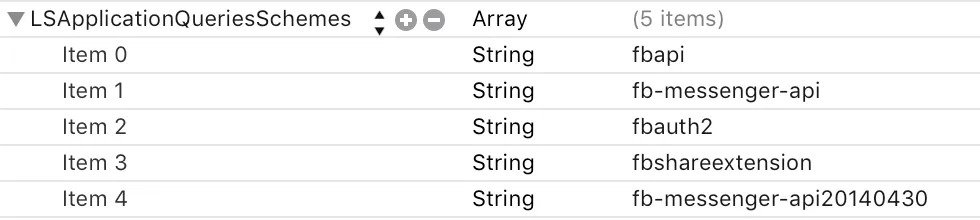
Step 8: Follow FBSDK instructions
The fbsdk React Native package installs the iOS FacebookSDKautomatically. However, there are still two things you have to do that are nicely described in the official docs (skip step 1 and 2 as we’ve already done them) and the guide for developers.
After you’ve followed the above instructions, you should have the following settings in your Info.plist:
and
.jpeg)
and a bunch of methods added to your AppDelegate.m
Things added by me following FBSDK docs were commented with `// Added by FBSDK`
Note: If the Facebook app doesn’t return back to your app after a successful authentication — you might need to make sure you’ve done all these steps.
Step 9: Run the app
Now — you can just hit Run from within Xcode and hopefully your React Native login works flawlessly!
.jpeg)
Recap
Congratulations on getting to the end of this long arduous tutorial! We’re aware that there are simply too many steps to setup such a simple thing and are working on making it much nicer.
If you have some ideas to share, please leave a comment or visit rnpm/rnpm#144and let us know what you think. On a positive note — you now know how to use CocoaPods which effectively means you can install other SDKs without copying & pasting them to your repository.
Big thanks to Mateusz Zatorski for helping me with the list of steps required and to Dave Sibiski for proofreading it so quickly!
Learn more about
React Native
Here's everything we published recently on this topic.


We can help you move
it forward!
At Callstack, we work with companies big and small, pushing React Native everyday.
React Native Performance Optimization
Improve React Native apps speed and efficiency through targeted performance enhancements.
Code Sharing
Implement effective code-sharing strategies across all platforms to accelerate shipping and reduce code duplication.
Mobile App Development
Launch on both Android and iOS with single codebase, keeping high-performance and platform-specific UX.
React Native Development
Hire expert React Native engineers to build, scale, or improve your app — from day one to production.
