iOS Brownfield App With React Native in an Easy Way

Let's start with answering the question: what is a brownfield application?
The term "brownfield" implies something built with already existing elements. Originally used in urban planning to describe areas that can be repurposed, it was later adopted in mobile app development. A brownfield app is basically an app which is not built from scratch.
What does it mean in practice? It means that we want to run a React Native application as a part of a native app that is already developed with technologies like Java, Kotlin, Objective-C or Swift. In other words, we want to integrate React Native in an existing app.
How does it work?
Let's assume that we have a native iOS application where we want to create a new screen using react-native app that is already implemented. That screen will navigate to another screen inside the react-native application.
In order to make it works, we need to do a few things.
Adding React Native to the project
- First of all, we need to add our React Native app to an existing native project. We will want to decide what parts of the React Native framework you would like to integrate. We will use CocoaPods for it. Let's edit or create Podfile in the native project and add React and all needed subspecs with path pointed to <rte-code>node_modules<rte-code> and run <rte-code>pod install<rte-code> command.
Running a React Native app
- When the React Native app is properly linked to the native one, we need to create a class that implements <rte-code>RCTBridgeDelegate<rte-code> - at least the <rte-code>sourceURLForBridge<rte-code> method that is needed to specify which JS bundle will be used.
- Then create a React Native bridge instance ( <rte-code>RCTBridge<rte-code> ) with the previously implemented class as the delegate and <rte-code>launchingOptions<rte-code> dictionary if needed.
- Create <rte-code>ViewController<rte-code> where we will set the <rte-code>rootView<rte-code> of the react-native app as a view property.
- Finally, we can push our react-native view controller to the stack
Additional steps
In debug mode, we need packager to serve JS bundle. However, Apple has blocked implicit cleartext HTTP resource loading. So we need to add the following our project’s <rte-code>Info.plist<rte-code> (or equivalent) file.
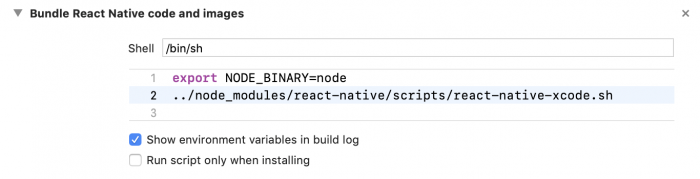
In addition, we can add scripts to <rte-code>Build Phases<rte-code> which will build react-native bundle and images for us:
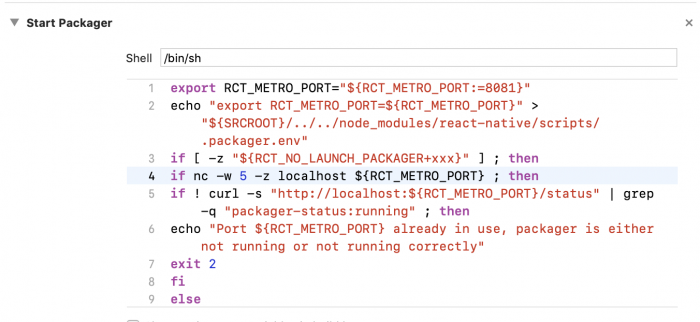
And the script that will run the packager:
Navigation issues
We have set it all right now, however, there is an issue with <rte-code>swipe to back<rte-code> functionality. We are not able to get back to our native screen via a swipe gesture or by means of <rte-code>Go Back<rte-code> button. We need some mechanism that would make possible to say from <rte-code>react-native<rte-code> to the native part that we want back to our native screen or that we want to enable/disable native <rte-code>PopGestureRecognizer<rte-code>. It could be solved by a react-native native module which will send notification by <rte-code>NSNotificationCenter<rte-code>.
BUT wait... Can't it be done in simpler way? Do we really need to take care of <rte-code>RCTBridgeDelegate<rte-code>, <rte-code>RCTBridge<rte-code>, <rte-code>RCTRootView<rte-code>?
Of course, it might be easier. :) We can use react-native-brownfield package which will help us with navigation's issues and provide a nice API to run a react-native application.
How does it work with React Native brownfield?
We want to achieve exactly the same effect as before but we will use <rte-code>react-native-brownfield<rte-code> library.
Adding React Native to the project
The theory is the same as I described in the previous part of this article but with some facilities. In order to run our React Native app in a native one using react-native-brownfield we need to add that package as a dependency to <rte-code>package.json<rte-code> using:
or
Next, we need to add the React Native app as we did in <rte-code>Add react-native to project<rte-code> point using CocoaPods.
Running a React Native app
And now the fun begins :) Instead of creating a bridge by ourselves we can simply use <rte-code>ReactNativeBrownfield<rte-code> package.
Import <rte-code>ReactNativeBrownfield<rte-code> package and create the instance of it with the entry file name.
We are ready to run react-native app using <rte-code>startReactNative<rte-code> method of our <rte-code>reactNativeBrownfieldManager<rte-code>
And that's it. We can push react-native app view controller to the navigation stack with user-friendly API.
Additional steps
All additional steps are needed to be added here as well
- Edit <rte-code>Info.plist<rte-code> file to allow connection to the packager
- Add script to <rte-code>Build Phases<rte-code> to run packager
- Add script to <rte-code>BuildPhases<rte-code> to bundle JS code and assets
Navigation issues
<rte-code>react-native-brownfield<rte-code> comes with a solution for the issues mentioned above. It exposes two methods that can be used in JS code to toggle back gesture and pop to a native screen.
- <rte-code>ReactNativeBrownfield.setNativeBackGestureAndButtonEnabled<rte-code> - to toggle iOS native back gesture
- <rte-code>ReactNativeBrownfield.popToNative<rte-code> - to pop to the native screen
And voilà! We are ready to go :)
Conclusion
It is a popular thing to use React Native within existing native apps especially by larger organizations that have multiple teams working on the same app for multiple platforms. Thanks to React Native brownfield the integration is easier, enjoyable and some issues that exist in every React Native brownfield app are solved. :)
Working examples of using react-native-brownfield are inside example directory.
As part of The React Native Show, we released a podcast fully dedicated to future of Brownfield Development with React Native.

Learn more about Brownfield
Here's everything we published recently on this topic.